
Build Logs
Build Log: Silverblade Armor, Week One — Finding the Shape
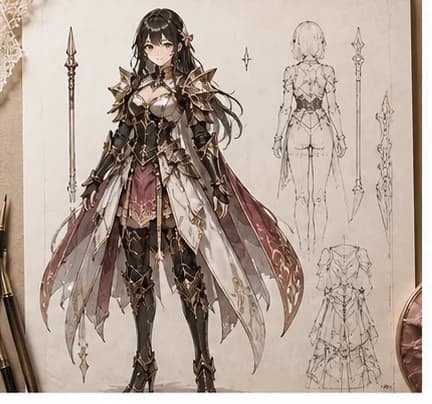
The first week of an original EVA foam armor build: locking the silhouette, testing shoulder shapes, and making early material decisions.
The goal for week one
This is an original character build — no existing reference sheet to work from, which means the first week is entirely about decisions. Not cutting, not gluing, not painting. Just figuring out what the armor is before committing to foam.
The character concept is a fantasy paladin-type with layered plate armor over a dark undersuit. Think high fantasy knight, but designed for mobility at a convention — which means every cool-looking detail needs to survive 6+ hours of walking, sitting, and posing.
Locking the silhouette
I started by sketching rough shapes on paper — not detailed blueprints, just overall proportions. The most important question for any armor build is: what does the silhouette read from 20 feet away? That's how far a photographer sees you before they decide to stop you for a photo.
Three things drive silhouette on armor:
- Shoulder width and height — pauldrons that extend 2-3 inches past the shoulder read as "armored knight." Too small and they look like football pads.
- Waist definition — a belt or tasset line that narrows the profile keeps the build from looking like a box. This was a lesson from my last build where I skipped the waist armor and the whole thing looked tubby.
- Proportion from head to foot — the chest plate shouldn't overwhelm the legs. I'm planning greaves and thigh pieces specifically to balance the visual weight of the chest and shoulders.
After four sketches, I settled on a shape: broad pauldrons with a slight upward sweep, a tapered cuirass, belt with small hip plates, and simple greaves. No cape for this build (capes are a mobility nightmare at crowded cons).
Testing shoulder shapes in cardboard
Before touching foam, I cut cardboard mockups of both pauldron shapes. This took about an hour and answered two critical questions:
-
Does the shoulder edge sit right? The armor reads best when the pauldron edge sits slightly higher than the natural shoulder. Too low and it looks like it's sliding off. Too high and it limits head movement.
-
Can I still move my arms? I taped the cardboard to a t-shirt and did the convention movement test: arms up for photos, arms at sides for walking, reaching across my body, and sitting in a folding chair. The first version was too wide — my right arm hit the shoulder plate when I raised it. Trimmed 1.5cm from the inner edge and the movement was fine.
Cardboard mockups feel silly but they've saved me from cutting foam wrong on at least three builds. An hour of cardboard saves a day of rework in foam.
Material decisions so far
Based on the design:
- 6mm EVA foam for all main armor panels — chest, back, pauldrons, greaves. It's light enough for a full-day convention and thick enough to look substantial.
- 2mm craft foam for surface details — raised trim lines, panel accents, and the emblem on the chest plate. The thin foam layers well on top of 6mm for a "layered plate" effect.
- 10mm EVA — maybe for the belt buckle and shoulder caps where I want a thicker, more dimensional look. Not decided yet.
- Barge contact cement for structural bonds and hot glue for temporary fitting while I test shapes.
The waist detail is the one open question. It could be simplified — a clean belt with no hip plates — without changing the overall impression. If the timeline gets tight, this is the first scope cut.
Based on the materials list above, the Craft Build Cost Estimator puts an armor build like this at roughly $180-250 before buffer. I started with the EVA Foam Armor template and adjusted from there.
What's next
Week two goals:
- Pattern the chest plate on paper, transfer to cardboard, test fit
- Pattern the back plate (less complex — mostly flat with a slight curve)
- Order foam if not already in inventory
- Make one paint swatch before cutting the second shoulder — I want to confirm the finish color before I commit to trim detail depth
The hardest decision so far: the shoulder strap placement. The pauldrons need to attach firmly enough to stay in place during movement but can't dig into the shoulders after 6 hours. I'm considering an over-the-shoulder elastic strap attached to the chest plate, with the pauldrons snapping onto the strap with neodymium magnets. But I need to test the magnet strength against the weight of finished, painted pauldrons. That test is for week two.
Frequently
asked questions.
Sources & references
We link to the brands, retailers, and research we reference so you can verify and explore.
- 1Barge Cement — contact cement used for structural foam bonds
- 2TNT Cosplay Supply — retailer for EVA foam sheets (6mm, 10mm) and cosplay supplies
- 3SKS Props — retailer for EVA foam and craft foam sheets