
Painting
Paint Swatches Save More Costumes Than Perfect Plans
Why testing paint, primer, and sealant on scrap material before touching your build prevents cracking, color mismatch, and late-night repainting.
The swatch is a decision record
A paint swatch isn't a test — it's a decision record. It tells you exactly which primer, base coat, accent color, wash, and sealant worked together on the actual material you're using. When you're painting piece number six and can't remember if you dry-brushed with silver or gunmetal, the swatch answers that question.
I started keeping labeled swatches after I repainted an entire cuirass because I mixed "dark steel" by eye on the second session and it didn't match the first. Now every swatch gets a strip of masking tape on the back with the layer order written in Sharpie.
Test on the real material
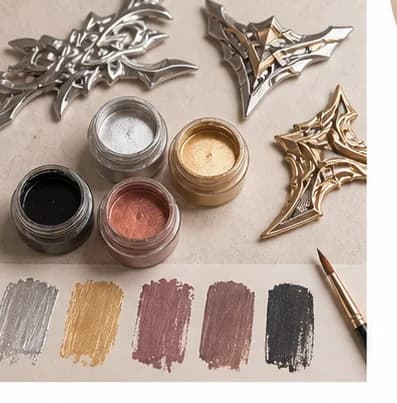
Painting on cardboard or paper tells you nothing useful. Paint behaves differently on sealed EVA foam than on anything else — the texture, absorption, and flexibility all change how color looks and how well it sticks.
Make swatches on scraps from your actual build. Use the same foam, with the same sealant, primed the same way. If your build uses Flexbond over 6mm EVA, your swatch should too.
For each swatch, apply your full layer stack:
- Sealant — Flexbond, Plasti Dip, or your chosen primer (same number of coats as the real build)
- Base coat — your primary color in 2-3 thin coats
- Accent or detail layer — if applicable
- Wash — thinned dark paint for depth (mix black acrylic with water at roughly 1:3)
- Dry brush — lighter color brushed across raised edges for highlights
- Clear coat — matte or satin clear spray to protect everything
Label each layer on the back. Photograph the swatch in daylight (not under workshop fluorescents — they shift color significantly).
Check flexibility and durability
For armor, color and finish are only half the test. You also need to check:
- Bend the swatch. Does the paint crack at flex points? If yes, your primer layer is too thick or too rigid. Flexbond handles flex better than Plasti Dip for joints.
- Scratch it gently with a fingernail. Does paint lift or flake? You may need another clear coat layer, or the sealant didn't bond properly to the foam.
- Leave it in sunlight for an afternoon. Some spray paints (especially metallics) shift color in UV light. Better to find out on a scrap than on your finished chest plate.
- Rub it against fabric. If you're wearing armor over clothing, check that the paint doesn't transfer to your shirt or bodysuit. This is especially common with metallic rub-and-buff finishes.
A color that looks perfect but cracks at the shoulder is not finished yet. Go back to the primer stage on a new swatch and test with thinner layers or a more flexible base.
Color matching across sessions
Cosplay painting rarely happens in one session. You'll paint the bracers one weekend and the pauldrons the next. The goal is consistency, and swatches are your reference point.
Tips for color matching:
- Use the same paint brand and color code across all pieces. Don't mix brands — "gunmetal" from Apple Barrel and "gunmetal" from FolkArt look completely different on foam.
- Mix custom colors in bulk. If your base coat is a mix (say, 3 parts brown + 1 part black + a touch of red), mix enough for the entire build in one batch. Store it in a sealed jar — acrylic paint lasts months if it doesn't dry out.
- Compare wet vs. dry. Acrylic paint dries 10-15% darker than it looks wet. Always compare your working swatch to a fully dry one.
- Photograph swatches in the same lighting you'll photograph the final costume in. Convention hall lighting is different from your garage.
Weathering swatches: test the story
If your costume has weathering — battle damage, dirt, rust, age — test those layers on swatches too. Weathering is the easiest part to overdo.
Build a "weathering ladder" on a single swatch:
- Start with your finished base paint
- Add a light dirt wash (brown acrylic thinned with water, applied into crevices)
- Add edge highlighting (dry brush silver or light gray on raised edges)
- Add chips and scratches (sponge on dark paint, then edge with a lighter tone)
- Add rust spots if appropriate (stipple orange-brown, then edge with dark brown)
Stop at each step and photograph it. You'll probably find that step 2-3 looks great and step 5 looks overdone. That's the point — the swatch tells you where to stop before you've committed to the final piece.
Find problems while they're small
The goal is not to make every test beautiful. The goal is to find problems while they're still small enough to fix:
- Primer bubbling? Fix your application technique on a swatch, not on your finished build.
- Silver paint looking blue under warm light? Try a different silver on a new swatch.
- Clear coat turning your matte finish glossy? Test a matte clear coat on the swatch before spraying the whole armor set.
A swatch takes 15 minutes and $0 in materials (you're using scraps). A full repaint takes 4-8 hours and a lot of frustration. The math is obvious, but I still meet cosplayers at conventions who've never tested paint on scrap foam before going all-in on their build.
Frequently
asked questions.
Sources & references
We link to the brands, retailers, and research we reference so you can verify and explore.
- 1Rosco Flexbond — flexible foam sealant product specifications and usage guidelines
- 2Plasti Dip — rubberized coating product line for sealing and priming
- 3Apple Barrel acrylic paints — craft acrylic paint line by Plaid Enterprises
- 4FolkArt acrylic paints — premium craft acrylic paint line by Plaid Enterprises
- 5DecoArt — Americana acrylic paint line for crafters
- 6Liquitex — professional-grade acrylic paints since 1955
- 7Golden Artist Colors — professional acrylic paints for detail and custom mixing