
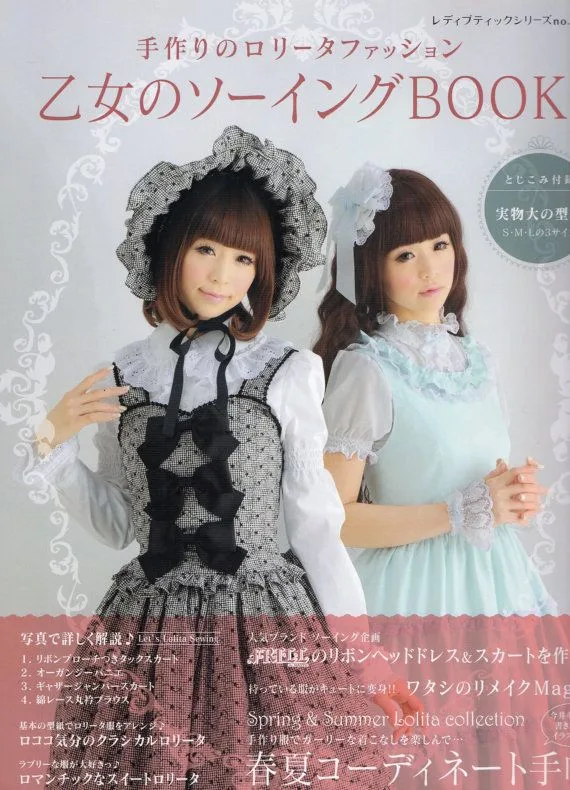
Sweet Lolita JSK
A sweet lolita jumperskirt: fitted bodice, gathered or pleated skirt with shirring or lace-edged waistband, tiered ruffles, lace trim everywhere. The bodice is the technical core, the lace application is where precision shows, and the skirt needs serious volume without looking limp. 6 components, 12 materials, ~4 weeks, $70-180.
4 weeks
18
12
6
See the whole look before you start.
References, materials, budget, and build order for Sweet Lolita JSK.
Timeline
4 weeks
Color refs


Materials
12 items
Budget
$70 - $180
save the visual refs
Full reference board
The preview above is curated for scanning. This is the working board you clone into your own build, with notes, colors, product images, and extra references intact.
Images are sourced from around the internet to help you get started. Use the web clipper to build your own reference library.
Build guide
The bodice is the entire build. Everything else is gathering and trim.
I've made three lolita JSKs, and the first one sat in a pile of disappointing seams for two years because I didn't understand how much the bodice matters. The skirt was fine. The lace was fine. But the bodice didn't fit because I drafted it without test-fitting, and it showed immediately. A bad bodice makes the whole thing look homemade and uncomfortable, which kills the lolita silhouette before you even leave your room.
Make a muslin mockup. Measure your bust, natural waist, and hips accurately. If you use a commercial pattern, trace it in muslin first. If you're drafting from scratch, use a fitted t-shirt you already own as a base, add minimal ease (just 1 inch total at the bust), cut it out, and sew it together on your body or on a friend. Sew the seams loose so you can adjust them. Try it on. The bodice should sit close to your ribcage without compressing, nip slightly at the natural waist, and have room to breathe at the hips. When you move your arms, the seams shouldn't pull. This testing phase takes three or four hours and saves your entire build.
I found a quilted cotton dress at Goodwill in Portland for $2.50 that was almost exactly the right color. I cut it apart and used the quilted pieces as lining inside a printed cotton bodice, which added both structure and luxury to what would've been a flat shell. Look for thrifted fabric when you can. You'll find weight and texture you didn't know you needed.
Once your bodice pattern is proven, cut fashion fabric with interfacing. Heavyweight interfacing at center front and back gives you structure without boning. Sew your seams, press them open, and reinforce the side seams with bias tape on the inside. The bias tape distributes stress and makes the bodice last years of con wear. Most sewers skip this, and their seams split.
Shirring elastic on the back is faster than an invisible zipper and looks right for sweet lolita. Threading shirring elastic through your machine is finicky if you haven't done it before. Wind it on your bobbin by hand (do not use the automatic winding), pull it gently so it's tight enough to gather the fabric as you sew, and test on a fabric scrap first. Zig-zag your elastic to three parallel rows of gathering across the back panels. It's not fast, but it works. When the JSK is finished, try it on: the shirring should give you 2 to 3 inches of sizing flexibility.
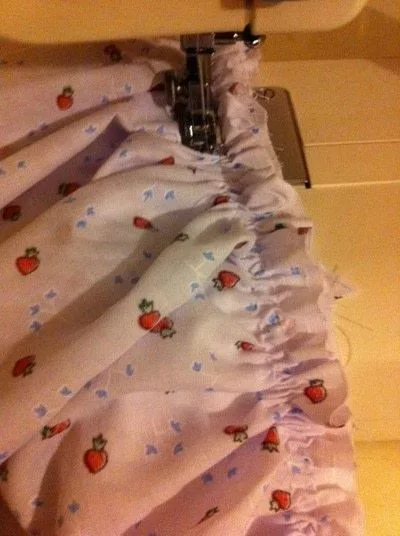
The skirt is gathering and structure. Cut your fabric panels tall enough to hit mid-calf (account for your inseam, not your height), and cut total width to 2.5 to 3 times your waist measurement. Gather to your waistband using long gathering threads or the gathering foot on your machine. Attach your lining before gathering if you want a clean underside, or attach it after if you're more comfortable with the order.
This is where lace application lives. Stitch slowly. Use short stitch length (1.5mm to 2mm). Your thread should be invisible (or match perfectly), and your stitches should run along the top edge of the lace so they don't show from the front. Start at the hem: apply your widest lace first, stitched close to its top edge. Then layer a narrower lace 4 inches up. Then another. Each tier is a separate line of stitching. It's repetitive and meditative. Most people mess this up by stitching in the middle of the lace or trying to use zigzag stitch, which creates bulk. Don't. Straight stitch, top edge only, invisible thread or a perfect color match.
Attach a petersham ribbon waistband to your bodice. This ribbon is stiff and structured, and it sits on top of your side seams for reinforcement. It's the difference between a homemade-looking waist and a professional finish.
The whole build takes four weeks if you're not rushing. Budget $70 to $180 depending on how fancy you go with lace and fabric. The Joann down the street from me had a coupon the week I started, so I came in at $92 for a build that would've hit $145. Don't skip lining. A lined skirt hangs better, looks more polished, and lasts longer at events.
Get your petticoat sorted before the finished JSK even comes off the machine. A graduated tulle petticoat (cheap tulle sewn in layers to a single waistband) takes two hours and costs under $20. It makes the silhouette. The skirt alone will look flat and sad.
Components
Fitted bodice (front and back)
Gathered or pleated skirt with lace overlay
Back closure (shirring or invisible zipper)
Waistband and sash accent
Lace trim and apron front (optional)
Petticoat (optional, for support)
Materials list
12 itemsEstimated total cost
$70 - $180
Milestone timeline
4 weeks- 1
Gather lolita JSK references and decide on silhouette (gathered vs pleated, tiered vs simple)
Research
- 2
Purchase all fabrics and notions, test lace on scraps
Materials
- 3
Take accurate bust, waist, and hip measurements
Patterning
- 4
Draft or source and adjust bodice pattern
Patterning
- 5
Mock up the bodice in muslin and fit test
Patterning
- 6
Cut and interface all bodice pieces
Construction
- 7
Sew bodice front and back, set shoulder seams
Construction
- 8
Set the back closure (apply shirring or install zipper)
Construction
- 9
Cut and prepare skirt panels and lining
Construction
- 10
Gather or pleat skirt panels to width
Construction
- 11
Attach lining to skirt, leaving top edge open
Construction
- 12
Apply lace trim to skirt hem and create tiered effect
Details
- 13
Attach petersham waistband to bodice
Construction
- 14
Attach gathered skirt to bodice waistband
Construction
- 15
Construct and attach optional petticoat
Construction
- 16
Finish all seams and hems for durability
Finishing
- 17
Add bows, ribbons, and final details
Finishing
- 18
Full garment try-on and fit adjustment
Wear test
Frequently
asked questions.
Related tools and guides
Plan your build, estimate costs, and get ready.
Budget Calculator
Estimate your build cost before you start buying materials.
Convention Checklist
88-item packing checklist. Check off items as you pack.
Prop Scaling Calculator
Scale reference images to your body measurements.
How Much Does a Sewing Project Cost?
Real build budgets with specific products and dollar amounts.
Sewing on Costumary
Templates, tools, and workspace built for sewing makers.
Browse all templates
Explore build plans across 10 craft verticals.
Start this build free
Clone this template into your workspace. Track materials, milestones, budget, and build progress in one place.
Related templates
Commission Garment
8 weeks · 15 milestones
Build a garment for a client with measurements, muslin fittings, approval checkpoints, and professional handoff. Covers client briefs, quoting, remote fitting strategies, progress communication, and shipping finished garments safely.
Layered Petticoat
2 weeks · 14 milestones
A multi-layered petticoat or crinoline for historical dresses, lolita coords, or cosplay skirts. The fullness comes from gathering long fabric strips and stacking them in tiers, building volume without a rigid frame. Choose between cotton voile for light fluff or organza for structure and visible iridescence. 4 components, 11 materials, ~2 weeks, $30-80.
Cottagecore Dress
3 weeks · 13 milestones
A prairie-inspired cottagecore dress with puffed sleeves, gathered skirt, and delicate finishing. The puffed sleeves are the focal point, requiring careful sleeve cap sizing and gathering. This is a forgiving first garment project for sewers who want something wearable and romantic. 4 components, 11 materials, ~3 weeks, $50-140.
Regency Day Dress
5 weeks · 13 milestones
An empire-waist dress with gathered skirt and puffed sleeves, grounded in Regency-era silhouettes (1811-1820). The high waistline and tailored bodice define the build; the challenge is matching the delicate fabric drape and hand-finishing details that period gowns demanded. 5 components, 11 materials, ~5 weeks, $100-280.