
Renaissance Bodice
A structured renaissance faire bodice with boned channels and lace-up front or back closure. The boning is the make-or-break detail: it holds the silhouette and prevents slumping after hours of wear. Choose between an overbust or underbust style, pick your lacing direction, and layer it over a chemise for authentic drape. 5 components, 12 materials, ~4 weeks, $80-200.
4 weeks
15
12
5
See the whole look before you start.
References, materials, budget, and build order for Renaissance Bodice.
Timeline
4 weeks
Color refs


Materials
12 items
Budget
$80 - $200
save the visual refs
Full reference board
The preview above is curated for scanning. This is the working board you clone into your own build, with notes, colors, product images, and extra references intact.
Images are sourced from around the internet to help you get started. Use the web clipper to build your own reference library.
Build guide
Buy the linen in person. I can't stress this enough. Linen photographs wrong online, the colors shift depending on the dye lot, and if you grab something without seeing it next to your skin tone, you'll end up with fabric that feels wrong the second you drape it over a chemise. I found a gorgeous heavy-weight linen at the Joann in Winter Park for $22/yd and it was worth driving there instead of ordering it sight-unseen.
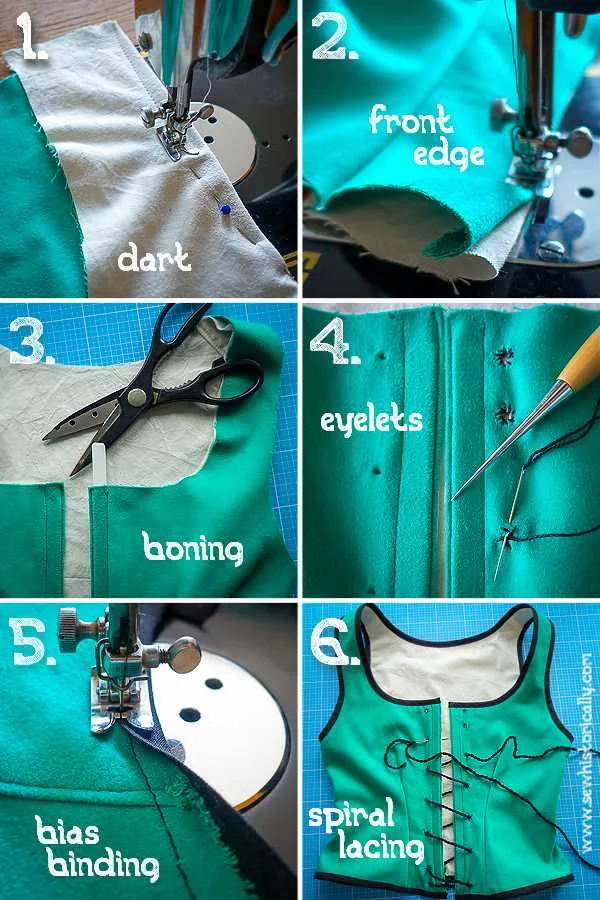
This bodice is a structure problem that looks like a sewing problem. The build is simple: cut two pieces (front and back), sew them to a lining that has boning channels topstitched into it, set eyelets, lace it up. The technique itself is straightforward. What catches people is the boning.
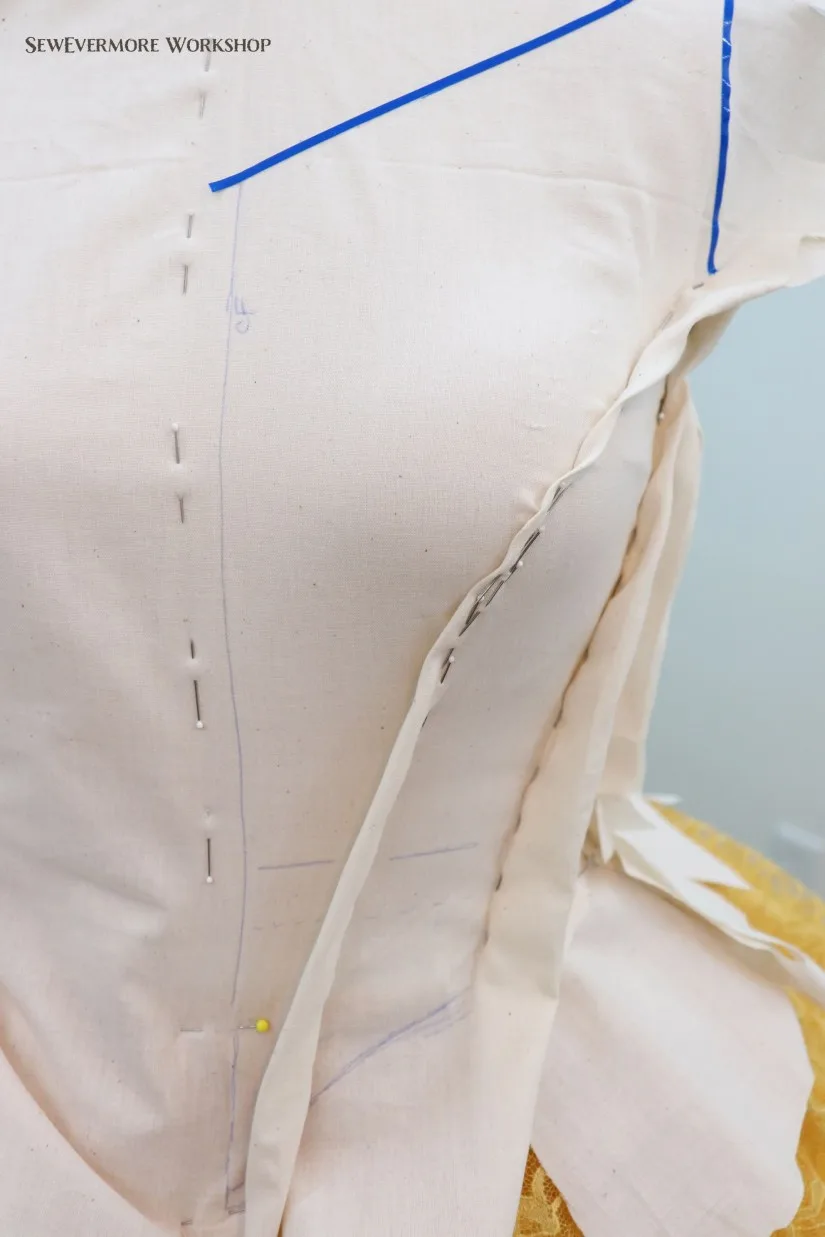
Boning channels are the make-or-break detail. They hold your silhouette all day and keep the fabric from slumping. If your channels are straight and parallel, the bodice will sit beautifully. If they curve or wander, the whole thing twists and gaps under the arms. Before you even cut fabric, practice on a scrap. Topstitch a channel on some heavyweight cotton, mark it with tailor's chalk and a ruler, use a walking foot (if you have one), and stitch straight lines 1.5 to 2 inches apart. Your first channel will be crooked. The second one will be better.
Here's the order that actually works: source or draft a pattern. Do a muslin mockup in cheap quilting cotton over a chemise. Check fit at the shoulders and bust. Adjust the pattern if the neckline pulls or the back yokes gap. Once you're happy, cut fashion fabric and lining. Sew your lining body together and topstitch all your boning channels on the lining before you ever attach the outer shell. This is non-negotiable because once the outer shell is attached, you can't reach the channels cleanly. Insert boning after the channels are done. Slide each bone in carefully, then stitch the bottom of the channel closed so the bone can't slip up. Sew outer shell pieces together, attach them to the lined bodice, bind your neckline and armholes, set eyelets, and lace.
Plastic boning costs $12 and lasts about 5 rewears before it starts to soften and lose support. Steel boning is $25 to $40 depending on grade, and you could theoretically wear this bodice 100 times. I use plastic for exploratory builds and steel for pieces I love. For your first bodice, plastic is the right choice.
Fit the bodice over a chemise, always. A long-sleeved linen chemise shifts everything onto your body correctly and keeps the boning off your skin. Without it, the lacing digs, the edges catch, and the whole experience is uncomfortable. Lacing should be snug enough that you can't wiggle out of it at a faire, but loose enough that you can raise your arms to shoulder height and bend forward to move heavy things (dairy maid reach). One finger under the lacing is the right tension. Too tight, and you can't breathe comfortably for 8 hours. Too loose, and the bodice shifts sideways and loses its shape.
I picked up the eyelet setter and a kit of 100 eyelets at Hancock Fabrics for $11.99, and it saved me from bashing holes with a hammer. Proper eyelets, set with an actual tool, don't pull through or deform under the tension of lacing. Mark your positions before setting anything. Use a ruler, measure from the top of the bodice, and make sure they're evenly spaced down both sides. If you're front-lacing, set them all the way down. If you're back-lacing with a side closure, lace from waist down and add hooks and eyes higher up.
Total time is about 4 weeks of evening sewing. Maybe 3 full days of elapsed work if you block it out. The bulk is sewing (both the shell and the lining) and topstitching all those channels. Lacing setup is quick, an hour or so. Fit adjustments take longer because you might need a helper to pull the lace while you check how it sits.
When you're done, try it on with the full outfit: chemise, bodice, and the skirt you'll wear at faire. Walk around. Sit down. Reach up. If the neckline pulls or the back gaps, note it. You can add darts or adjust the next one. But the bodice holds its shape and supports you for 8 to 10 hours, which is the whole point.
Components
Outer shell (fashion fabric)
Lining
Boning channels
Lacing system
Trim and finishing
Materials list
12 itemsEstimated total cost
$80 - $200
Milestone timeline
4 weeks- 1
Research renaissance bodice styles and pick overbust vs underbust
Research
- 2
Source or draft a pattern and measure for fit
Patterning
- 3
Gather materials: fabric, lining, boning, eyelets, lacing
Materials
- 4
Pre-wash and prepare fabrics if needed
Materials
- 5
Cut outer shell and lining pieces
Construction
- 6
Mark and plan boning channel placement
Construction
- 7
Sew lining body and topstitch boning channels
Construction
- 8
Insert boning into channels and secure ends
Construction
- 9
Sew outer shell pieces together
Construction
- 10
Attach lining to outer shell
Construction
- 11
Bind and finish neckline and armholes
Finishing
- 12
Set eyelets and thread lacing
Finishing
- 13
Add optional back closure (hook and eye or buttons)
Finishing
- 14
Try on and adjust fit with helper if needed
Fitting
- 15
Full wear test with chemise and period skirt
Wear test
Frequently
asked questions.
Related tools and guides
Plan your build, estimate costs, and get ready.
Budget Calculator
Estimate your build cost before you start buying materials.
Convention Checklist
88-item packing checklist. Check off items as you pack.
Prop Scaling Calculator
Scale reference images to your body measurements.
How Much Does a Sewing Project Cost?
Real build budgets with specific products and dollar amounts.
Sewing on Costumary
Templates, tools, and workspace built for sewing makers.
Browse all templates
Explore build plans across 10 craft verticals.
Start this build free
Clone this template into your workspace. Track materials, milestones, budget, and build progress in one place.
Related templates
Sweet Lolita JSK
4 weeks · 18 milestones
A sweet lolita jumperskirt: fitted bodice, gathered or pleated skirt with shirring or lace-edged waistband, tiered ruffles, lace trim everywhere. The bodice is the technical core, the lace application is where precision shows, and the skirt needs serious volume without looking limp. 6 components, 12 materials, ~4 weeks, $70-180.
Commission Garment
8 weeks · 15 milestones
Build a garment for a client with measurements, muslin fittings, approval checkpoints, and professional handoff. Covers client briefs, quoting, remote fitting strategies, progress communication, and shipping finished garments safely.
Layered Petticoat
2 weeks · 14 milestones
A multi-layered petticoat or crinoline for historical dresses, lolita coords, or cosplay skirts. The fullness comes from gathering long fabric strips and stacking them in tiers, building volume without a rigid frame. Choose between cotton voile for light fluff or organza for structure and visible iridescence. 4 components, 11 materials, ~2 weeks, $30-80.
Cottagecore Dress
3 weeks · 13 milestones
A prairie-inspired cottagecore dress with puffed sleeves, gathered skirt, and delicate finishing. The puffed sleeves are the focal point, requiring careful sleeve cap sizing and gathering. This is a forgiving first garment project for sewers who want something wearable and romantic. 4 components, 11 materials, ~3 weeks, $50-140.