
Coco Cosplay
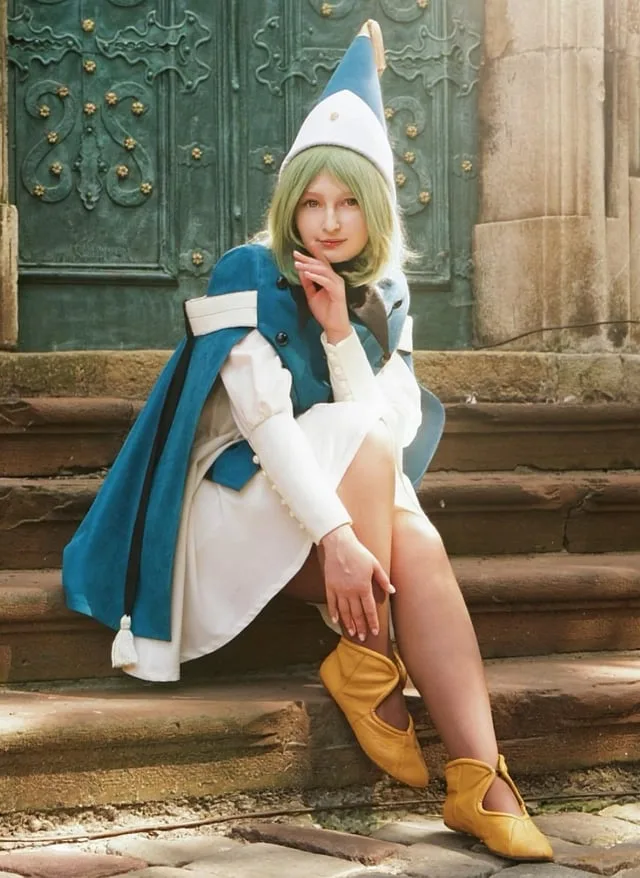
Witch Hat Atelier's apprentice witch in her full outfit: the tall pointed hat with ornamental band, a dark cloak with decorative hem trim, a layered tunic-dress, boots, and her drawing implements. The hat is the signature piece and the hardest to get right. 7 components, 13 materials, ~6 weeks at $120-280.
6 weeks
12
13
7
See the whole look before you start.
References, materials, budget, and build order for Coco.
Timeline
6 weeks
Color refs

Materials
13 items
Budget
$120 - $280
save the visual refs
Full reference board
The preview above is curated for scanning. This is the working board you clone into your own build, with notes, colors, product images, and extra references intact.
Images are sourced from around the internet to help you get started. Use the web clipper to build your own reference library.
Build guide
The hat. That's where you start and that's where 60% of your time goes. Everything else on this build is sewing you've probably done before, or shopping you can knock out in an afternoon. But the hat is millinery, and most cosplayers have never touched buckram in their lives.
I hadn't either, until this build. I bought my buckram from Judith M in the garment district in downtown LA, the shop on the second floor that smells like sizing and old cotton. Heavy-weight buckram, not the curtain stuff. The difference matters. Lightweight buckram collapses under a cone this tall. You need the stuff that fights back when you try to bend it.
The pattern is a flat arc segment for the cone and a donut for the brim. Not a triangle. I made that mistake on my first attempt and ended up with straight sides that looked like a traffic cone instead of a witch hat. The curve comes from cutting the cone as a sector of a circle. There are free templates online for various cone heights, but Coco's hat is tall, roughly 14-16 inches from brim to tip on a real head. Draft it on kraft paper first. You'll go through two or three drafts adjusting the brim width before it looks right.
Run 16-gauge craft wire around the brim edge. Sew it into a channel or sandwich it between two buckram layers. This is what keeps the brim from flopping. Without wire, the brim droops within an hour of wearing, especially in humid convention halls. I learned this at Anime Expo 2024 when my first prototype brim went completely limp by noon on Saturday.
Cover the buckram structure with your fashion fabric. Dark brown or charcoal wool-blend looks period-fantasy without reading as a Halloween costume. The decorative band around the base of the cone is what makes it read as Coco specifically. Jacquard trim or embroidered ribbon with a geometric or floral pattern. Shirahama draws incredibly intricate patterns on the hat band that you can't replicate stitch for stitch, but the right trim gets you 90% there from ten feet away.
Measure your head over the wig. Wigs add 1-2 inches of circumference. A hat that fits perfectly on bare hair will be too tight with the wig and you'll spend the whole day with a headache. Pin the hat to the wig with hat pins through the brim, not bobby pins alone. Bobby pins slide out of buckram.
The cloak and tunic are the straightforward parts. A 3/4 circle cloak in medium-weight fabric, lined. Full circle bunches too much at the shoulders and half circle doesn't have enough drape for that manga silhouette. Hem it at mid-calf, not floor-length. Floor-length cloaks catch on escalators and drag through convention center bathrooms. You don't want that.
The tunic is a gathered-waist dress in natural or cream linen-blend with a brown underskirt layer. Linen-blend reads period-fantasy. Pure white reads bedsheet. The belt and pouch you can thrift. I found a perfect worn leather belt at a Goodwill for $4 and a small drawstring pouch on Etsy for $12.
Total budget runs $120 to $280. The low end is cotton broadcloth and craft-store trim. The high end is wool blend with quality jacquard and real leather accessories. Six weeks is comfortable. Don't rush the hat. It's the kind of piece where an extra weekend of adjusting the cone angle pays off every time you wear it.
Components
Pointed witch hat with ornamental band
Dark cloak with decorative trim
Layered tunic-dress
Belt and pouch
Boots
Drawing implements (wand pen and ink bottle)
Wig (dark brown, mid-length)
Materials list
13 itemsEstimated total cost
$120 - $280
Milestone timeline
6 weeks- 1
Gather manga references and lock Coco's outfit details
Research
- 2
Buy and test the wig for color and volume
Materials
- 3
Draft the hat cone and brim pattern
Patterning
- 4
Draft or adapt a tunic pattern with gathered waist
Patterning
- 5
Sew the tunic and underskirt layers
Construction
- 6
Cut and sew the cloak body and lining
Construction
- 7
Build the hat structure with buckram and wire
Construction
- 8
Cover, trim, and finish the hat
Details
- 9
Attach decorative trim to hem and edges
Details
- 10
Source or make the belt and pouch
Construction
- 11
Build or modify the wand pen and ink bottle props
Details
- 12
Full suit-up with hat, cloak, tunic, and props
Wear test
Frequently
asked questions.
Related tools and guides
Plan your build, estimate costs, and get ready.
Budget Calculator
Estimate your build cost before you start buying materials.
Convention Checklist
88-item packing checklist. Check off items as you pack.
Prop Scaling Calculator
Scale reference images to your body measurements.
How Much Does EVA Foam Armor Cost?
Real build budgets with specific products and dollar amounts.
Cosplay on Costumary
Templates, tools, and workspace built for cosplay makers.
Browse all templates
Explore build plans across 10 craft verticals.
Debut your cosplay build
Upcoming conventions where you could wear this. Dates, checklists, and budget tools included.
Start this build free
Clone this template into your workspace. Track materials, milestones, budget, and build progress in one place.
More from this series
Qifrey Cosplay
5 weeks · 12 milestones
Qifrey's elegant white-robed silhouette is built around three signature elements: the tall pointed hat with the bent tip and black ribbon, the flowing white cape with the brass brooch closure, and the asymmetrical pince-nez glasses with one dark lens hiding his scarred eye. This is an intermediate build that needs more structural crafting than sewing. The hat and glasses demand the most attention, while the cape is a manageable garment project. The glasses and the hat are the make-or-break details, and this template walks you through both. Includes 7 components, 15 materials with cost estimates, a 12-step build plan, and a realistic 5-week, $95 to $280 budget.
Gojo Satoru Cosplay
5 weeks · 11 milestones
Jujutsu Kaisen's strongest sorcerer, built around three signature details: the black high-collar uniform jacket, the blindfold, and the white spiked hair. This is an intermediate build that leans on one well-made garment plus wig styling, so it reads instantly on the con floor without months of work. The collar and the wig are the make-or-break details, and this template walks you through both. Includes 6 components, 11 materials with cost estimates, an 11-step build plan, and a realistic 5-week, $90 to $240 budget.
Denji Cosplay
10 weeks · 15 milestones
Chainsaw Man's protagonist in his iconic hybrid form: the human body with a chainsaw head and transformable chainsaw arms. The hand-carved foam helmet with chain-link detailing is the make-or-break piece, demanding precision foam work and 8-12 weeks of dedicated building. A full build includes the school uniform base, prosthetic teeth, spiky hair, and the chainsaw arms or helmet. 6 components, 14 materials, ~10 weeks, $200-500.
Frieren Cosplay
5 weeks · 12 milestones
Frieren: Beyond Journey's End's elven mage, built around a white high-collar tunic with gold trim, a flowing blue cape, and a wooden staff with a red gem. This is an intermediate build that combines clean garment construction with prop craftsmanship, finished with styled twin-tail wig and elf ear prosthetics. The gold trim detailing and the staff are the signature details, and this template walks you through both. Includes 7 components, 14 materials with cost estimates, a 12-step build plan, and a realistic 5-week, $100 to $280 budget.