
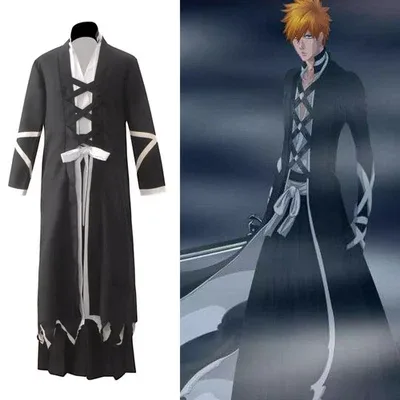
Ichigo Kurosaki Cosplay
Bleach's soul reaper in Bankai form: the massive orange spiky wig, the high-collar Shinigami uniform, black hakama pants, and the oversized Zanpakuto sword. The wig is the make-or-break detail—it's heavy and fragile, and it'll slide backward off your head if not secured with clips and a grip band. Skip the sword for con floor wear, or build it at 70-80% scale in EVA foam if you want the full look. 6 components, 12 materials, ~6 weeks, $110-280.
6 weeks
14
12
6
See the whole look before you start.
References, materials, budget, and build order for Ichigo Kurosaki.
Timeline
6 weeks
Color refs

Materials
12 items
Budget
$110 - $280
save the visual refs
Full reference board
The preview above is curated for scanning. This is the working board you clone into your own build, with notes, colors, product images, and extra references intact.
Images are sourced from around the internet to help you get started. Use the web clipper to build your own reference library.
Build guide
The wig is the entire build. I learned this the hard way after watching my first attempt slide off the back of my head within twenty minutes of walking the convention floor. You can sew the jacket perfectly, get the hakama fit right, paint the sword flawlessly. None of that matters if the orange hair isn't locked down.
Here's what works, and I mean it. Buy a pre-styled spiky orange wig at least 120cm long. Don't heat-style it. Synthetic fibers used in mass-produced wigs have a shockingly low melting point. A heat gun at even medium distance burns orange darker and frazzles the whole thing. The spikes are already there in the wig. You just need to keep them standing and keep the wig on your head. Got2b Glued spray gel handles the standing part. Barbed toupee clips sewed into six or eight points of the wig cap (forehead, temples, crown, back crown, nape sides) handle the staying-on part. Underneath that, wear a silicone wig grip band. Expensive. Worth it.
The jacket is a mandarin-collar pattern with some tweaking. The Shinigami uniform in Bleach has a specific high standing collar that needs heavyweight woven interfacing sewn into the inside of the neckline to maintain its shape. Not fused. Sewn, with a short zigzag stitch that'll hold through multiple wears and con floor chaos. Mock up the collar in muslin first. Wear it for an hour, move around, sit down, stand up. If it wilts or creases, the interfacing weight is too light. This is the detail that separates a messy costume from one that reads as intentional.
Hakama are simpler than they look. Two wide pant legs, a high waistband, drawstring closure. The trap everyone falls into is making them too narrow. Anime art lies about silhouette for visual drama. Draft the leg openings at least 8-10 inches wide at the hem so you can actually walk and sit without tearing seams. During your muslin test-fit, confirm the crotch seam hits your natural crotch, not two inches higher. If it's too high, adjust the pattern before cutting your final fabric. Black heavyweight cotton or linen blend reads best on camera and drapes the way Shinigami uniforms should.
The sword is optional. A full-scale Zanpakuto runs 4-5 feet and catches on every doorway and table at the convention. Build it at 70-80% scale in EVA foam with a reinforced PVC spine if you're committed. Seal everything with Flexbond before painting. Unsealed foam cracks and shatters on impact. But honestly, most Ichigo cosplayers I've run into just skip the prop for con floor wear. The costume reads as complete without it.
Budget six weeks, $110 to $280 depending on wig quality and whether you're building the sword. Start with the wig. You need to know the final size and weight before you start calculating jacket seam placements and shoulder guard proportions. Everything else cascades from there.
Components
Orange spiky wig
Shinigami uniform jacket
Hakama pants
Chest/shoulder detail
Wrist bands and accessories
Zanpakuto sword (optional)
Materials list
12 itemsEstimated total cost
$110 - $280
Milestone timeline
6 weeks- 1
Gather Ichigo Bankai references and decide: with or without sword
Research
- 2
Buy and test-fit the orange wig for weight and stability
Materials
- 3
Sew toupee clips into the wig cap (6-8 points)
Construction
- 4
Find or draft the Shinigami jacket and hakama patterns
Patterning
- 5
Mock up the high collar in muslin and test fit
Patterning
- 6
Test-fit hakama in muslin, check crotch height and leg width
Patterning
- 7
Cut and sew the jacket body with properly interfaced collar
Construction
- 8
Cut and sew the hakama with comfortable leg openings
Construction
- 9
Attach shoulder guards and chest details
Details
- 10
Sew and attach wrist cuffs with secure closures
Details
- 11
Style and set the orange wig with gel
Finishing
- 12
Draft and build the Zanpakuto sword at 70-80% scale (optional)
Construction
- 13
Seal, prime, and paint the sword with Flexbond and acrylics (optional)
Finishing
- 14
Full suit-up with wig, uniform, and accessories for wear test
Wear test
Frequently
asked questions.
Related tools and guides
Plan your build, estimate costs, and get ready.
Budget Calculator
Estimate your build cost before you start buying materials.
Convention Checklist
88-item packing checklist. Check off items as you pack.
Prop Scaling Calculator
Scale reference images to your body measurements.
How Much Does EVA Foam Armor Cost?
Real build budgets with specific products and dollar amounts.
Cosplay on Costumary
Templates, tools, and workspace built for cosplay makers.
Browse all templates
Explore build plans across 10 craft verticals.
Debut your cosplay build
Upcoming conventions where you could wear this. Dates, checklists, and budget tools included.
Start this build free
Clone this template into your workspace. Track materials, milestones, budget, and build progress in one place.
More from this series
Qifrey Cosplay
5 weeks · 12 milestones
Qifrey's elegant white-robed silhouette is built around three signature elements: the tall pointed hat with the bent tip and black ribbon, the flowing white cape with the brass brooch closure, and the asymmetrical pince-nez glasses with one dark lens hiding his scarred eye. This is an intermediate build that needs more structural crafting than sewing. The hat and glasses demand the most attention, while the cape is a manageable garment project. The glasses and the hat are the make-or-break details, and this template walks you through both. Includes 7 components, 15 materials with cost estimates, a 12-step build plan, and a realistic 5-week, $95 to $280 budget.
Gojo Satoru Cosplay
5 weeks · 11 milestones
Jujutsu Kaisen's strongest sorcerer, built around three signature details: the black high-collar uniform jacket, the blindfold, and the white spiked hair. This is an intermediate build that leans on one well-made garment plus wig styling, so it reads instantly on the con floor without months of work. The collar and the wig are the make-or-break details, and this template walks you through both. Includes 6 components, 11 materials with cost estimates, an 11-step build plan, and a realistic 5-week, $90 to $240 budget.
Spider-Man Suit Cosplay
5 weeks · 14 milestones
The classic red and blue web-slinger: a 4-way stretch spandex bodysuit with raised web lines, front and back spider emblems, white framed lenses, and wrist-mounted web shooters. This is an intermediate build. Spandex is forgiving if you use a dress form and take your time on the web lines. Covers 7 components, 11 materials with cost estimates, a 12-step build plan spread across 5 phases, and a realistic 5-week, $80 to $250 budget.
Armor Build
8 weeks · 14 milestones
Plan and build a full EVA foam armor set from reference images to convention floor. Covers patterning, heat-forming, sealing, painting, and strapping for cosplayers stepping up from simple pieces to a complete suit.