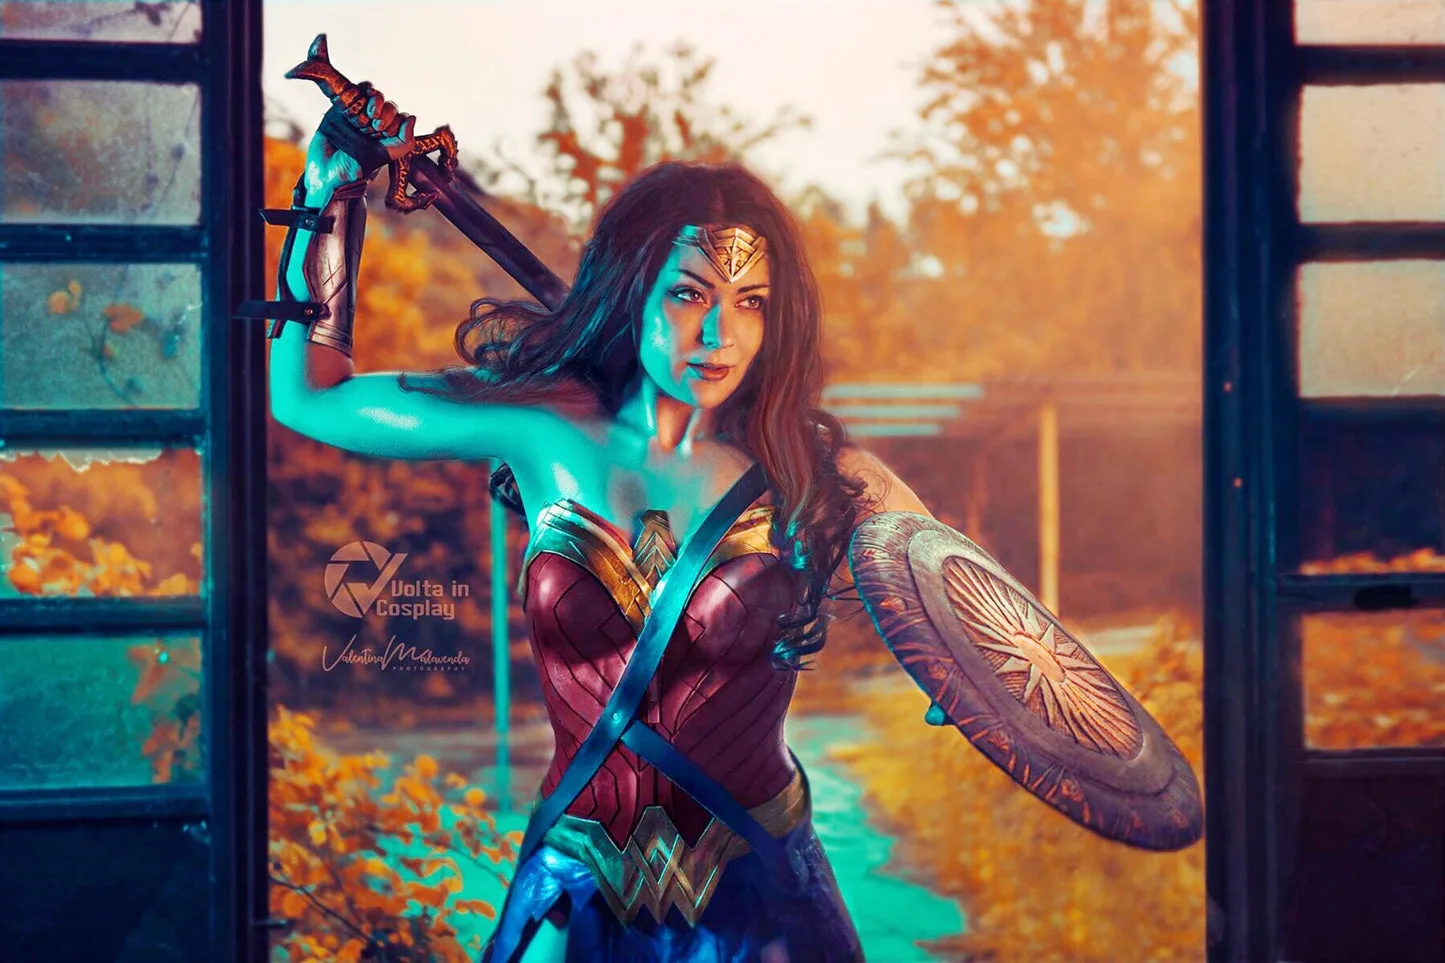
Wonder Woman Cosplay
The DCEU Gal Gadot warrior: a sculpted Worbla breastplate over a red corset base, layered leather tasset skirt, gold bracers, knee-high armored greaves, a forehead tiara, and the Lasso of Truth. This is an intermediate-advanced build combining thermoplastic armor shaping with leather work and metallic finishing. Covers 7 components, 12 materials with cost estimates, a 12-step plan across 5 phases, and a realistic 8-week, $180 to $450 budget.
8 weeks
12
14
7
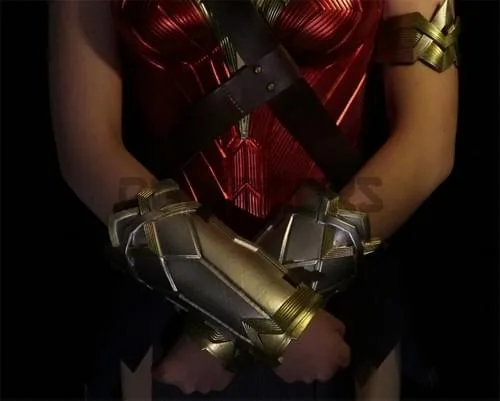
See the whole look before you start.
References, materials, budget, and build order for Wonder Woman.
Timeline
8 weeks
Color refs


Materials
14 items
Budget
$180 - $450
save the visual refs
Full reference board
The preview above is curated for scanning. This is the working board you clone into your own build, with notes, colors, product images, and extra references intact.
Images are sourced from around the internet to help you get started. Use the web clipper to build your own reference library.
Build guide
My first Wonder Woman breastplate cracked down the center seam on wear number three. I'd skipped the body cast, eyeballed the curves, and used pure EVA foam with no backing. It looked fine on the table. On my actual torso, bending to sit in a panel chair, the waist flex point split clean open. That was build one. Build two is the one I'm going to walk you through.
The body cast is the entire foundation and you cannot shortcut it. Wrap your torso in saran wrap (wear a tight tank top underneath, you'll thank me), then layer duct tape over it in strips until you have a rigid shell. Have a friend cut you out up the back. That shell becomes your dress form, and every breastplate panel gets drafted on it with a Sharpie. The DCEU breastplate has compound curves that don't exist on any commercial dress form. Your ribs curve differently than mine, your bust point sits higher or lower, and if you skip this step you'll get a plate that gaps at the sternum or digs into your floating ribs after forty minutes on the con floor. I spent an entire Saturday on the cast and pattern drafting. It felt like wasted time. It wasn't. Every piece I shaped after that fit on the first try because the pattern was actually my body.
I use Worbla's Black Art over a 2mm EVA foam base. Black Art because its activation temperature is higher (around 100C versus 80C for Finest Art), and I've worn this at outdoor summer cons in Southern California where pavement temps hit triple digits. Standard Worbla sags in direct sun. Black Art holds. The foam underneath gives flex so it doesn't crack when you sit or twist. Heat your panels and drape them over bust forms shaped from balloons matched to your cup size. Not a flat surface. Not a bowl.
For finishing, prime with three coats of Flexbond, sanding lightly between each. Then a flat black base, then Rub 'n Buff Gold Leaf applied with your fingertip. A pea-sized dab covers more than you'd expect. Buff with a microfiber cloth. Seal everything with Krylon matte clear coat or the gold will transfer to your skin, your wig, and your friend's white shirt when they hug you.
The tasset skirt is straightforward but test it early. Cut your faux leather strips with a slight taper (wider at the bottom) and attach them to a separate belt with Chicago screws so they hang independently from the breastplate. I sewed small washers into the bottom hems to keep them from flipping up on windy days or stairs. I picked up my faux leather at the Joann in Torrance on Hawthorne Blvd, two yards for about $24 on a 50% off coupon day.
Bracers, greaves, tiara, and lasso are secondary builds that go faster once the breastplate is done. Shape your bracers with your arm slightly bent or they'll pinch at the inner wrist. The tiara is a scrap of Worbla with Rub 'n Buff and a silicone wig grip strip glued inside. Mine hasn't moved in three full con days.
Budget lands between $180 and $450 depending on whether you already own a heat gun and how much Worbla you waste on test pieces. I wasted $30 in Worbla on my first breastplate attempt before getting the shaping right. Eight weeks is realistic with evenings per weeknight and longer weekend blocks for priming and painting. The body cast week feels slow. Do it anyway. The rest moves fast when fit isn't something you're fighting.
Components
Breastplate and corset
Tiara headpiece
Gladiator skirt (tassets)
Bracers (pair)
Boot greaves and knee guards
Lasso of Truth
Shield (optional)
Materials list
14 itemsEstimated total cost
$180 - $450
Milestone timeline
8 weeks- 1
Pick your Wonder Woman version and gather reference images
Research
- 2
Create saran wrap and duct tape body cast
Patterning
- 3
Source Worbla, foam, faux leather, and base boots
Materials
- 4
Draft breastplate pattern from body cast, shape bust cups
Construction
- 5
Assemble breastplate with eagle motif and W detail
Construction
- 6
Cut and assemble gladiator skirt tassets on belt
Construction
- 7
Build bracers: foam base, Worbla detail, paint
Construction
- 8
Shape boot greaves over base boots, attach with Barge
Construction
- 9
Prime all armor (Flexbond, 3 coats sanded between)
Finishing
- 10
Apply Rub 'n Buff gold/silver finish, seal with clear coat
Finishing
- 11
Build tiara and lasso, finish small props
Finishing
- 12
Full suit-up, mobility test, and convention dry run
Wear test
Frequently
asked questions.
Related tools and guides
Plan your build, estimate costs, and get ready.
Budget Calculator
Estimate your build cost before you start buying materials.
Convention Checklist
88-item packing checklist. Check off items as you pack.
Prop Scaling Calculator
Scale reference images to your body measurements.
How Much Does EVA Foam Armor Cost?
Real build budgets with specific products and dollar amounts.
Cosplay on Costumary
Templates, tools, and workspace built for cosplay makers.
Browse all templates
Explore build plans across 10 craft verticals.
Debut your cosplay build
Upcoming conventions where you could wear this. Dates, checklists, and budget tools included.
San Diego Comic-Con 2026
Jul 23–26 · San Diego, CA
The original and most iconic pop culture convention. Massive panels, Hall H, and the epicenter of entertainment announcements.
OffKai Expo 2026
Jul 24–26 · San Jose, CA
GalaxyCon Raleigh 2026
Jul 24–26 · Raleigh, NC
A Raleigh pop culture convention with celebrity guests, comic artists, and a growing cosplay scene.
Lakeland Anime-Fest 2026
Jul 25–25 · Lakeland, FL
Start this build free
Clone this template into your workspace. Track materials, milestones, budget, and build progress in one place.
More from this series
Qifrey Cosplay
5 weeks · 12 milestones
Qifrey's elegant white-robed silhouette is built around three signature elements: the tall pointed hat with the bent tip and black ribbon, the flowing white cape with the brass brooch closure, and the asymmetrical pince-nez glasses with one dark lens hiding his scarred eye. This is an intermediate build that needs more structural crafting than sewing. The hat and glasses demand the most attention, while the cape is a manageable garment project. The glasses and the hat are the make-or-break details, and this template walks you through both. Includes 7 components, 15 materials with cost estimates, a 12-step build plan, and a realistic 5-week, $95 to $280 budget.
Coco Cosplay
6 weeks · 12 milestones
Witch Hat Atelier's apprentice witch in her full outfit: the tall pointed hat with ornamental band, a dark cloak with decorative hem trim, a layered tunic-dress, boots, and her drawing implements. The hat is the signature piece and the hardest to get right. 7 components, 13 materials, ~6 weeks at $120-280.
Gojo Satoru Cosplay
5 weeks · 11 milestones
Jujutsu Kaisen's strongest sorcerer, built around three signature details: the black high-collar uniform jacket, the blindfold, and the white spiked hair. This is an intermediate build that leans on one well-made garment plus wig styling, so it reads instantly on the con floor without months of work. The collar and the wig are the make-or-break details, and this template walks you through both. Includes 6 components, 11 materials with cost estimates, an 11-step build plan, and a realistic 5-week, $90 to $240 budget.
Frieren Cosplay
5 weeks · 12 milestones
Frieren: Beyond Journey's End's elven mage, built around a white high-collar tunic with gold trim, a flowing blue cape, and a wooden staff with a red gem. This is an intermediate build that combines clean garment construction with prop craftsmanship, finished with styled twin-tail wig and elf ear prosthetics. The gold trim detailing and the staff are the signature details, and this template walks you through both. Includes 7 components, 14 materials with cost estimates, a 12-step build plan, and a realistic 5-week, $100 to $280 budget.