
Vegeta Cosplay
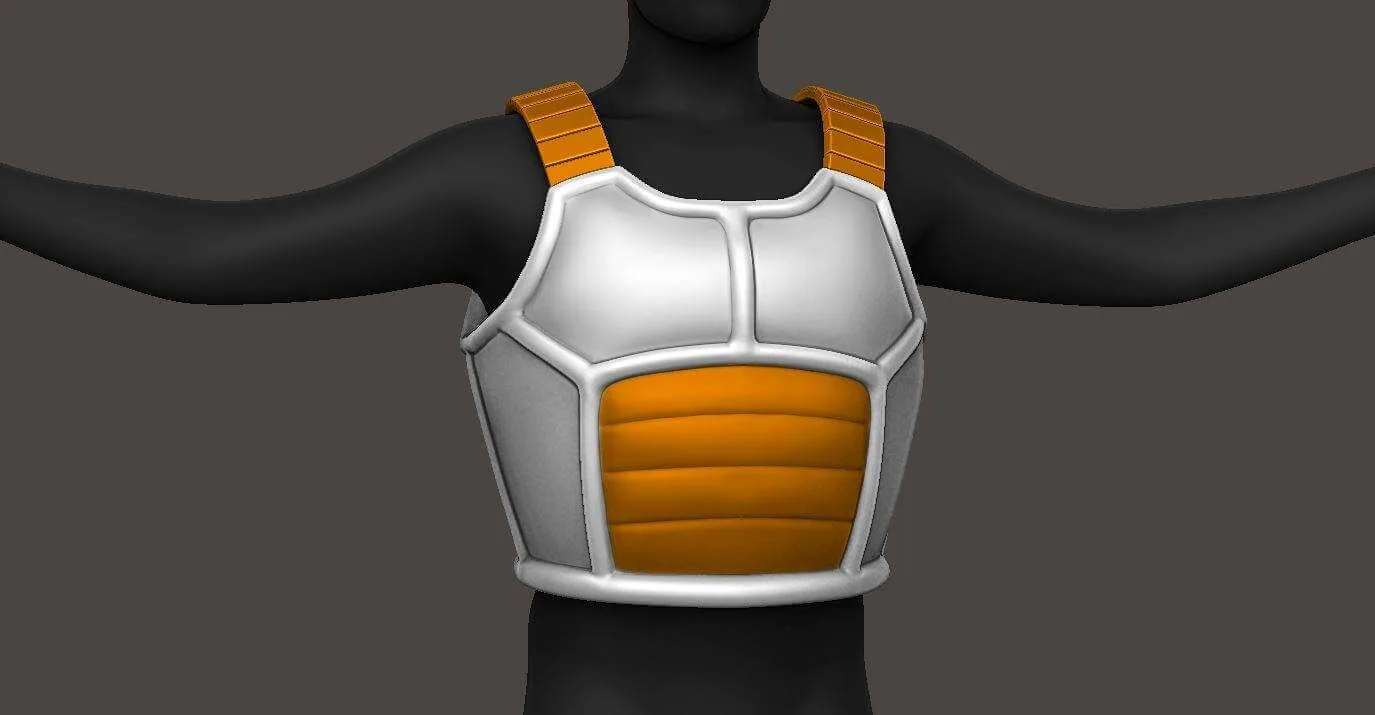
The Saiyan Prince's iconic battle armor: metallic silver-blue chest plate and shoulder pauldrons over a bright blue bodysuit, topped with gravity-defying spiky black hair. This intermediate build focuses on flexible foam armor construction, color-matching metallic spray finishes, and gravity-proof wig styling. 5 components, 12 materials, roughly 6 weeks.
6 weeks
12
12
5
See the whole look before you start.
References, materials, budget, and build order for Vegeta.
Timeline
6 weeks
Color refs


Materials
12 items
Budget
$120 - $280
save the visual refs
Full reference board
The preview above is curated for scanning. This is the working board you clone into your own build, with notes, colors, product images, and extra references intact.
Images are sourced from around the internet to help you get started. Use the web clipper to build your own reference library.
Build guide
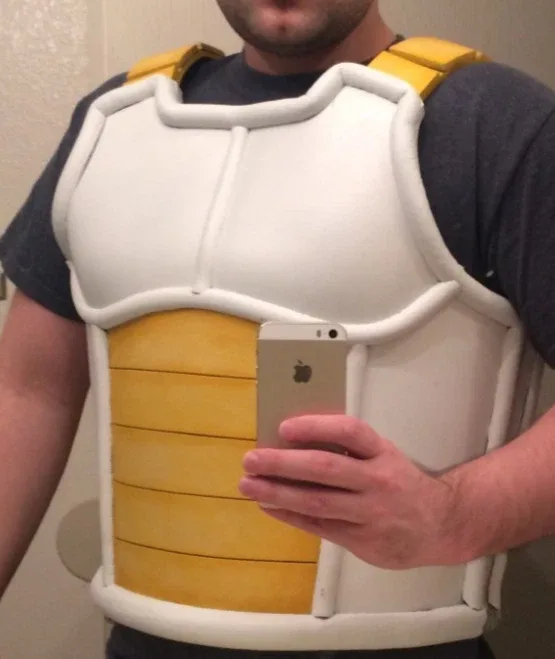
I ruined my first Vegeta armor by gluing the chest plate flat to the back plate with contact cement. Solid foam to solid foam. Seemed logical at the time. Then I bent at the waist and heard an awful cracking sound from the center seam. Had to peel it apart and rebuild on a stretch fabric backing.
Everyone thinks more material means better armor. Thicker foam, stronger glue, harder structure. Wrong. Vegeta's suit needs to move with your body or it cracks at the stress points. You're wearing a 2-3 pound chunk of EVA strapped to your torso. If that can't flex when you reach or twist, something breaks. Use 6mm foam, not 10mm. It's lighter, more flexible, and still looks massive when assembled. Mount the armor pieces onto stretch black fabric backing instead of gluing foam directly to foam. Barge contact cement on the foam, press it onto the fabric, wait for it to set. When you wear it, the fabric stretches at stress points instead of the foam cracking. My second Vegeta suit has been worn six times and the seams are still perfect.
The pauldrons are where everyone panics. Those huge shoulder pieces need to stay anchored but mobile. Use neodymium magnets sunk into both the chest plate and pauldrons, with velcro as backup. The magnets are strong enough to hold but weak enough to release if you get bumped hard instead of ripping your shoulder. I learned that the expensive way at a con.
Vegeta's armor is metallic silver-blue, like chrome tinted with blue. You'll see different colors in different anime scenes. Pick one and commit. I use Duplicolor Metallic Blue because it's consistent and reads well under convention lights. Test it on a scrap piece under fluorescents before spraying the full pieces. Metallic paint looks completely different under home lighting versus con center overheads.
The wig demands industrial spray. Vegeta's spikes go straight back and need to stay that way for eight hours surrounded by humidity. Got2b Glued is the gold standard. Apply it while the wig is still hot from the blow dryer. Heat opens the synthetic fiber and locks the spray in as it cools. At the con, plan touch-ups every ninety minutes. The spikes will droop in humidity. Bring a travel can in your bag. I've met five other Vegeta cosplayers who skipped backup spray and looked sad all day.
Budget six weeks working evenings. Cutting and assembly is about three weeks. The rest is waiting for sealant, primer, and paint to cure between coats. Don't skip dry time. Flexbond needs 24 hours, primer needs 24 hours, paint needs at least 12. I got my materials from the Joann Fabrics in Long Beach, Amazon, and a local prop shop for Barge cement. The Long Beach Joann is consistently stocked with foam floor mats and elastic webbing, which saved me when I had to rebuild.
Make the bodysuit bright electric blue, not navy. It needs to pop against the metallic armor. Navy makes the whole silhouette muddy. I made that mistake on my first version and the photos looked completely wrong even though the fabric was technically blue. Switched to two-ply blue spandex and started over. Don't make my regret your regret.
Components
Chest and back armor plate
Shoulder pauldrons
Styled black spiky wig
Bright blue bodysuit
Gloves and boots
Materials list
12 itemsEstimated total cost
$120 - $280
Milestone timeline
6 weeks- 1
Gather reference images from multiple angles and angles
Research
- 2
Source or dye the blue bodysuit to match reference
Materials
- 3
Buy and test the wig, confirm spikes hold with spray
Materials
- 4
Cut armor templates from cardstock and fit to body
Patterning
- 5
Cut and heat-shape chest and back foam plates
Construction
- 6
Assemble chest plate on stretch backing, test flex at waist
Construction
- 7
Heat-shape and install shoulder pauldrons with suspension
Construction
- 8
Seal all foam with 3-4 coats of Flexbond
Finishing
- 9
Prime with gloss black, apply metallic silver-blue coats
Finishing
- 10
Spike and heat-set the wig, apply hold spray
Finishing
- 11
Add purple trim to gloves and boots
Details
- 12
Full suit-up test with mobility and con-day wear simulation
Wear test
Frequently
asked questions.
Related tools and guides
Plan your build, estimate costs, and get ready.
Budget Calculator
Estimate your build cost before you start buying materials.
Convention Checklist
88-item packing checklist. Check off items as you pack.
Prop Scaling Calculator
Scale reference images to your body measurements.
How Much Does EVA Foam Armor Cost?
Real build budgets with specific products and dollar amounts.
Cosplay on Costumary
Templates, tools, and workspace built for cosplay makers.
Browse all templates
Explore build plans across 10 craft verticals.
Debut your cosplay build
Upcoming conventions where you could wear this. Dates, checklists, and budget tools included.
Start this build free
Clone this template into your workspace. Track materials, milestones, budget, and build progress in one place.
More from this series
Qifrey Cosplay
5 weeks · 12 milestones
Qifrey's elegant white-robed silhouette is built around three signature elements: the tall pointed hat with the bent tip and black ribbon, the flowing white cape with the brass brooch closure, and the asymmetrical pince-nez glasses with one dark lens hiding his scarred eye. This is an intermediate build that needs more structural crafting than sewing. The hat and glasses demand the most attention, while the cape is a manageable garment project. The glasses and the hat are the make-or-break details, and this template walks you through both. Includes 7 components, 15 materials with cost estimates, a 12-step build plan, and a realistic 5-week, $95 to $280 budget.
Coco Cosplay
6 weeks · 12 milestones
Witch Hat Atelier's apprentice witch in her full outfit: the tall pointed hat with ornamental band, a dark cloak with decorative hem trim, a layered tunic-dress, boots, and her drawing implements. The hat is the signature piece and the hardest to get right. 7 components, 13 materials, ~6 weeks at $120-280.
Gojo Satoru Cosplay
5 weeks · 11 milestones
Jujutsu Kaisen's strongest sorcerer, built around three signature details: the black high-collar uniform jacket, the blindfold, and the white spiked hair. This is an intermediate build that leans on one well-made garment plus wig styling, so it reads instantly on the con floor without months of work. The collar and the wig are the make-or-break details, and this template walks you through both. Includes 6 components, 11 materials with cost estimates, an 11-step build plan, and a realistic 5-week, $90 to $240 budget.
Denji Cosplay
10 weeks · 15 milestones
Chainsaw Man's protagonist in his iconic hybrid form: the human body with a chainsaw head and transformable chainsaw arms. The hand-carved foam helmet with chain-link detailing is the make-or-break piece, demanding precision foam work and 8-12 weeks of dedicated building. A full build includes the school uniform base, prosthetic teeth, spiky hair, and the chainsaw arms or helmet. 6 components, 14 materials, ~10 weeks, $200-500.