
Ubel Cosplay
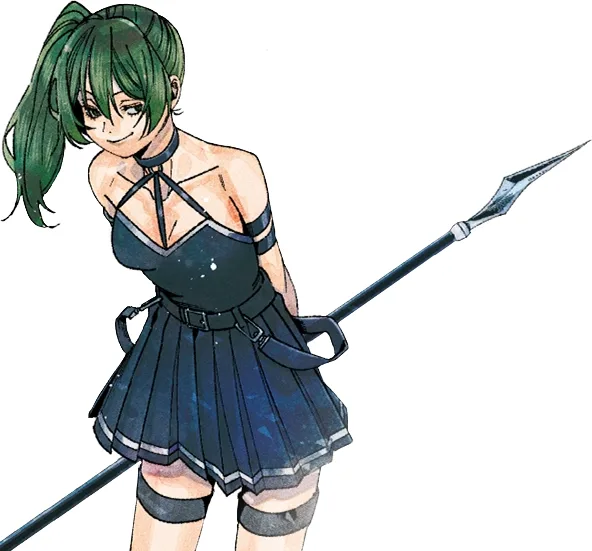
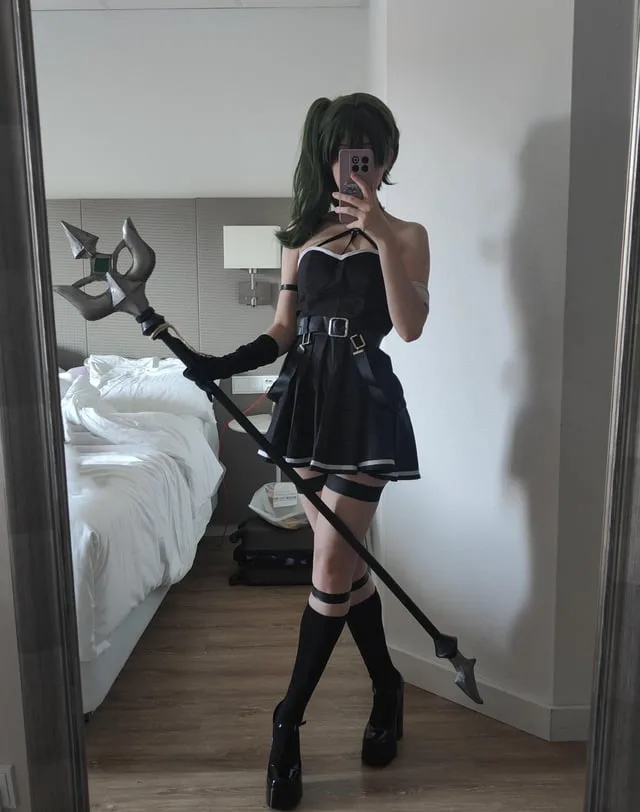
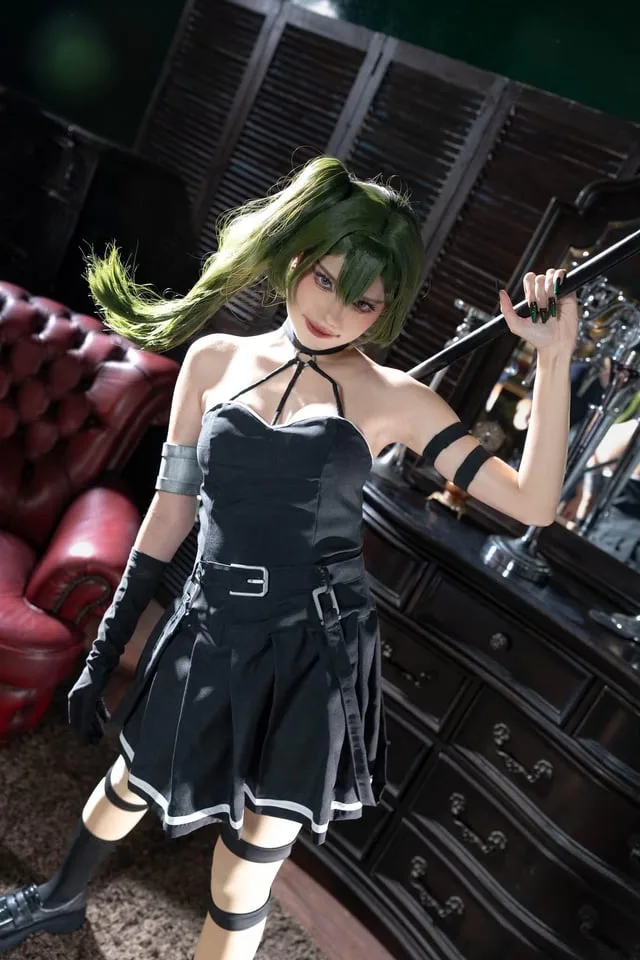
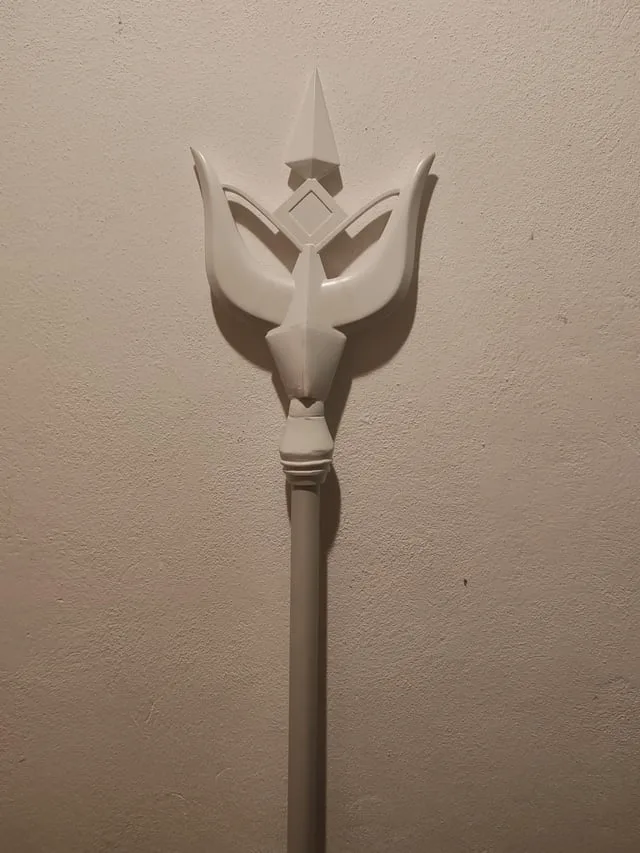
Frieren's most chilling mage rendered in matte black: the strappy asymmetric halter top with choker strap routing, her signature below-knee boots with white trim, stacked arm and leg rings, and the oversized scythe-staff prop that defines her silhouette. The prop and the wig are the two decisions that determine whether this build reads as Ubel or just another dark anime character. Includes 7 components, 14 materials with cost estimates, a 12-step build plan, and a realistic 6-week, $110 to $280 budget.
6 weeks
14
14
7
See the whole look before you start.
References, materials, budget, and build order for Ubel.
Timeline
6 weeks
Color refs

Materials
14 items
Budget
$110 - $280
save the visual refs
Full reference board
The preview above is curated for scanning. This is the working board you clone into your own build, with notes, colors, product images, and extra references intact.
Images are sourced from around the internet to help you get started. Use the web clipper to build your own reference library.
Reference images are gathered from around the web and belong to their original creators. We link back to where we found each one. If something here is yours and you want it taken down, email us and it is gone.
Build guide
I got the strap routing wrong on my first attempt at this build. Spent an afternoon modifying a halter base, tried it on, took a photo, and realized every strap was running parallel when they're supposed to converge at a center ring like a choker-to-top harness. Had to unpick and redo the whole thing. Took me an extra two hours that I wouldn't have lost if I'd counted the straps in the reference before picking up the scissors.
That's the thing about Ubel. She looks simple. Dark outfit, minimal colors, no big sculptural armor pieces. But the details that make her her are structural, and if you get them wrong the costume just reads as "girl in black." Four straps on the halter top, three in front converging at a ring, one in back. A wired ahoge on the wig that holds a specific upward curve. And a 155cm staff that needs a breakdown joint or you can't get it into your car.
Start with the wig so you have time to re-order if it arrives wrong. You want a short, slightly textured black wig, not an ultra-sleek one. The ahoge needs a pipe cleaner or floral wire threaded through it before you style anything, then Got2b Freeze Spray to seal. I picked up both at the Michaels in Brea while I was there sourcing foam, and the wire cost me $2.49 for a whole pack. Gel alone droops by hour two.
The prop is the only genuinely hard piece. I used 8-10mm EVA foam for the blade and a NATAcosplaycraft template (Etsy, ~$6) which gave me exact cut lines and saved probably four hours of reference-matching work. The staff is plain 1-inch PVC pipe from any hardware store. The critical step most people skip: add a breakdown joint right below where the blade meets the staff. A threaded PVC repair coupling from Home Depot costs $3. Without it, you have a 155cm rigid piece that won't lie flat in your car, won't fit through narrow doorways horizontal, and will hit every overhead light fixture in the convention center hallway.
For the garments: buy a black halter base (knit fabric, $15-20) and modify the straps rather than sewing from scratch. Stretch knit is annoying to sew without a serger or at least a stretch needle and stitch. The modification itself is fast once you have the right reference image open on your phone. For the rings (arm bands, thigh rings, ankle rings), cut your own from wide black elastic sized to your actual limbs. The ring sets in bought costume packages are sized generically and they all slide. An elastic ring that fits snugly stays put.
One thing I'd do differently: plan the prop transport before building the blade, not after. I had the whole thing assembled, beautiful, matte black paint, ready to go, and then stood in my hallway realizing it wasn't fitting in my hatchback without the breakdown joint I'd skipped. Had to disassemble, add the coupling, repaint the join. Budget six weeks if you're doing the prop yourself, less if you're buying a pre-made staff.
Components
Strappy asymmetric halter top
Dark shorts or mini skirt
Below-knee boots with white trim
Belt and pouch accessories
Arm and leg ring accessories
Styled dark messy wig with wired ahoge
Staff/scythe prop
Pattern Plan
Real sewing patterns for each piece of the Ubel costume: the commercial base to start from, a free alternative where one exists, and the exact modifications that turn the base into the character-accurate piece.
Strappy asymmetric halter top
Modifications for strappy asymmetric halter top: Use the halter top view only. The pattern's O-ring connects the halter neck to the bodice via loops, which is the closest commercial analog to Ubel's four-strap choker-ring construction. Add three narrow front straps (cut 1.5cm wide from your knit) converging at the O-ring instead of the pattern's single neck loop. Remove the cutout detail and replace with a solid panel. Use a matte black stretch jersey rather than the pattern's suggested wovens — swap any notched seams to a stretch stitch or narrow zigzag.
This costume's top is usually better served by buying a plain black knit halter base and rerouting the straps than by sewing from a pattern. If you do sew, S9756 is the closest verified commercial pattern with ring-to-bodice hardware construction. The strap routing is the critical modification — three front straps converging at the ring, not parallel straps side by side.
Dark shorts or mini skirt
Modifications for dark shorts or mini skirt: Use View D or E (semi-fitted through hips). Shorten to 3-4 inches above mid-thigh to match Ubel's silhouette. Switch from the pattern's woven fabric recommendation to a ponte or scuba knit for the matte stretch texture that reads correctly with the rest of the costume. The elastic waistband works as drafted.
These shorts are simple enough that a basic boxers-style elastic-waist pattern works as well as any. If you're not sewing, plain black bike shorts from any retailer modified to the correct length are a faster and cheaper option.
Materials list
14 itemsEstimated total cost
$110 - $280
Milestone timeline
6 weeks- 1
Gather references and confirm which Ubel look you're building
Research
- 2
Buy and test the wig
Materials
- 3
Source or buy the base halter top
Materials
- 4
Plan prop dimensions and breakdown strategy
Research
- 5
Map strap routing against reference images
Patterning
- 6
Sew or modify straps and anchor the choker ring hardware
Construction
- 7
Source or sew the shorts/skirt base
Construction
- 8
Make arm bands, thigh rings, and ankle rings
Details
- 9
Source or assemble belt and attach pouches
Details
- 10
Build the blade from EVA foam or 3D print
Construction
- 11
Assemble and paint staff
Finishing
- 12
Source or make boots and add white trim accent
Finishing
- 13
Style wig texture and wire the ahoge strand
Finishing
- 14
Full suit-up, prop test, and con-floor walk practice
Wear test
Frequently
asked questions.
Related tools and guides
Plan your build, estimate costs, and get ready.
Budget Calculator
Estimate your build cost before you start buying materials.
Convention Checklist
88-item packing checklist. Check off items as you pack.
Prop Scaling Calculator
Scale reference images to your body measurements.
How Much Does EVA Foam Armor Cost?
Real build budgets with specific products and dollar amounts.
Cosplay Commission Cost Breakdown
Real build budgets with specific products and dollar amounts.
Cosplay on Costumary
Templates, tools, and workspace built for cosplay makers.
Browse all templates
Explore build plans across 10 craft verticals.
Debut your cosplay build
Upcoming conventions where you could wear this. Dates, checklists, and budget tools included.
Start this build free
Clone this template into your workspace. Track materials, milestones, budget, and build progress in one place.
More from this series
Frieren Cosplay
5 weeks · 12 milestones
Frieren: Beyond Journey's End's elven mage, built around a white high-collar tunic with gold trim, a flowing blue cape, and a wooden staff with a red gem. This is an intermediate build that combines clean garment construction with prop craftsmanship, finished with styled twin-tail wig and elf ear prosthetics. The gold trim detailing and the staff are the signature details, and this template walks you through both. Includes 7 components, 14 materials with cost estimates, a 12-step build plan, and a realistic 5-week, $100 to $280 budget.
Qifrey Cosplay
5 weeks · 12 milestones
Qifrey's elegant white-robed silhouette is built around three signature elements: the tall pointed hat with the bent tip and black ribbon, the flowing white cape with the brass brooch closure, and the asymmetrical pince-nez glasses with one dark lens hiding his scarred eye. This is an intermediate build that needs more structural crafting than sewing. The hat and glasses demand the most attention, while the cape is a manageable garment project. The glasses and the hat are the make-or-break details, and this template walks you through both. Includes 7 components, 15 materials with cost estimates, a 12-step build plan, and a realistic 5-week, $95 to $280 budget.
Coco Cosplay
6 weeks · 12 milestones
Witch Hat Atelier's apprentice witch in her full outfit: the tall pointed hat with ornamental band, a dark cloak with decorative hem trim, a layered tunic-dress, boots, and her drawing implements. The hat is the signature piece and the hardest to get right. 7 components, 13 materials, ~6 weeks at $120-280.
Sung Jinwoo Cosplay
7 weeks · 15 milestones
Solo Leveling's Shadow Monarch in his iconic default hunter outfit: a long black coat with purple inner lining, structured shoulder armor, fitted pants, and dual daggers. This is an intermediate hybrid build that combines garment sewing with foam armor crafting for the shoulder details, plus prop work for the daggers. The coat and its glowing purple lining are the make-or-break detail. Includes 7 components, 19 materials with cost estimates, a 15-step build plan, and a realistic 5-7 week, $120 to $320 budget.
Gojo Satoru Cosplay
5 weeks · 11 milestones
Jujutsu Kaisen's strongest sorcerer, built around three signature details: the black high-collar uniform jacket, the blindfold, and the white spiked hair. This is an intermediate build that leans on one well-made garment plus wig styling, so it reads instantly on the con floor without months of work. The collar and the wig are the make-or-break details, and this template walks you through both. Includes 6 components, 11 materials with cost estimates, an 11-step build plan, and a realistic 5-week, $90 to $240 budget.
Deadpool Suit Cosplay
5 weeks · 12 milestones
The Merc with a Mouth in full red and black: a head-to-toe spandex bodysuit with diamond-textured fabric, a face shell mask with white magnetic lenses, dual katanas on a concealed back harness, and a utility belt with pouches and holsters. An intermediate build that rewards patience with fit and details. Covers 7 components, 12 materials with cost estimates, a 12-step build plan across 5 phases, and a 5-week timeline at $120 to $350.
Igris Cosplay
9 weeks · 14 milestones
Sung Jinwoo's elite shadow knight: jet-black full plate armor with a purple glow edge, the iconic red hair-like plume from the helmet, a tattered black cape, and a longsword. This is a full-armor advanced build combining EVA foam or 3D printing with LED lighting effects and a fully enclosed helmet with visibility modifications. The helmet visibility solution is the make-or-break detail. Includes 8 components, 17 materials with cost estimates, a 14-step build plan, and a realistic 8-10 week, $200 to $520 budget.
Arlecchino Cosplay
7 weeks · 17 milestones
Arlecchino (The Knave) is Genshin Impact's most cosplay-demanding Fatui Harbinger: a layered suit jacket, structured long coat with back chains, multi-color ombre wig, character-specific X-pupil contacts, and a full accessories set that runs 12+ pieces. This is an advanced build for cosplayers who can sew structured garments, handle prop accessories, and plan a full character makeup look. The make-or-break details are the coat's lapel structure and the wig's silver-black-red color work. Includes 8 components, 14 materials with cost estimates, a 12-step build plan, and a realistic 7-week, $180 to $420 budget.