Furina Cosplay
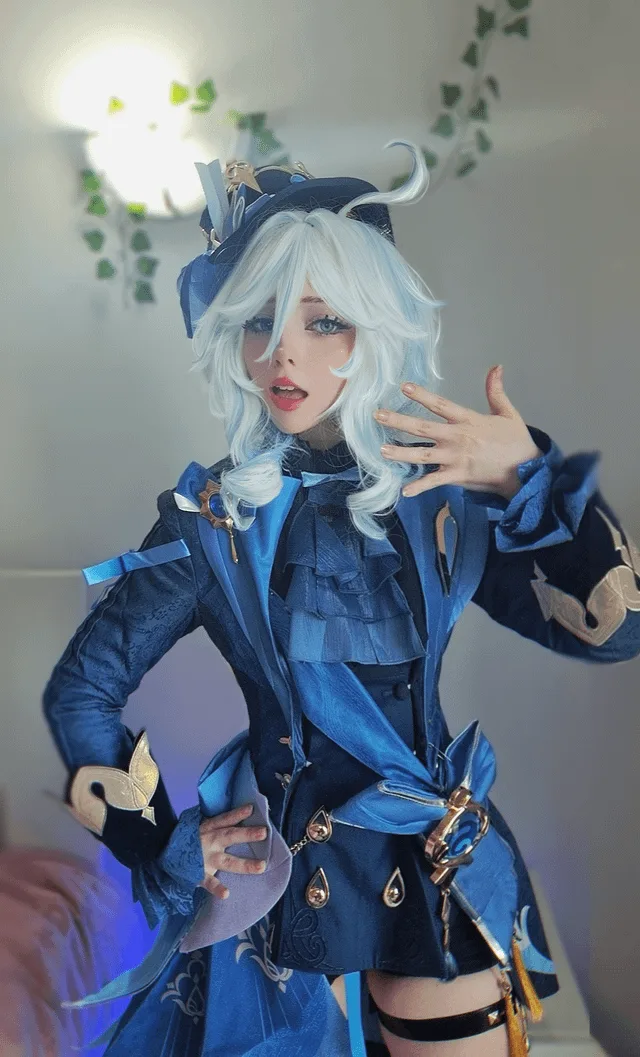
Fontaine's Hydro Archon in full Rococo splendor: the tilted top hat, cascading jabot collar, split-tail coat, and white-to-blue gradient wig with a wired ahoge. The hat is the make-or-break piece. It needs to hold its shape, sit at the right angle, and stay on the wig through a full convention day. 7 components, 13 materials, about 6 weeks, $120 to $300.
6 weeks
14
13
7
See the whole look before you start.
References, materials, budget, and build order for Furina.
Timeline
6 weeks
Color refs
Materials
13 items
Budget
$120 - $300
save the visual refs
Full reference board
The preview above is curated for scanning. This is the working board you clone into your own build, with notes, colors, product images, and extra references intact.
Images are sourced from around the internet to help you get started. Use the web clipper to build your own reference library.
Build guide
I wrecked my first Furina hat. Built the whole cylinder out of craft foam, covered it in satin, glued on the gold ribbon, and it buckled inward the second I tried to attach it to the wig. Looked like a sad blue soup can. The fix was so simple I'm still annoyed it took me two attempts: 1mm EVA foam, not craft foam. That single material swap changed everything.
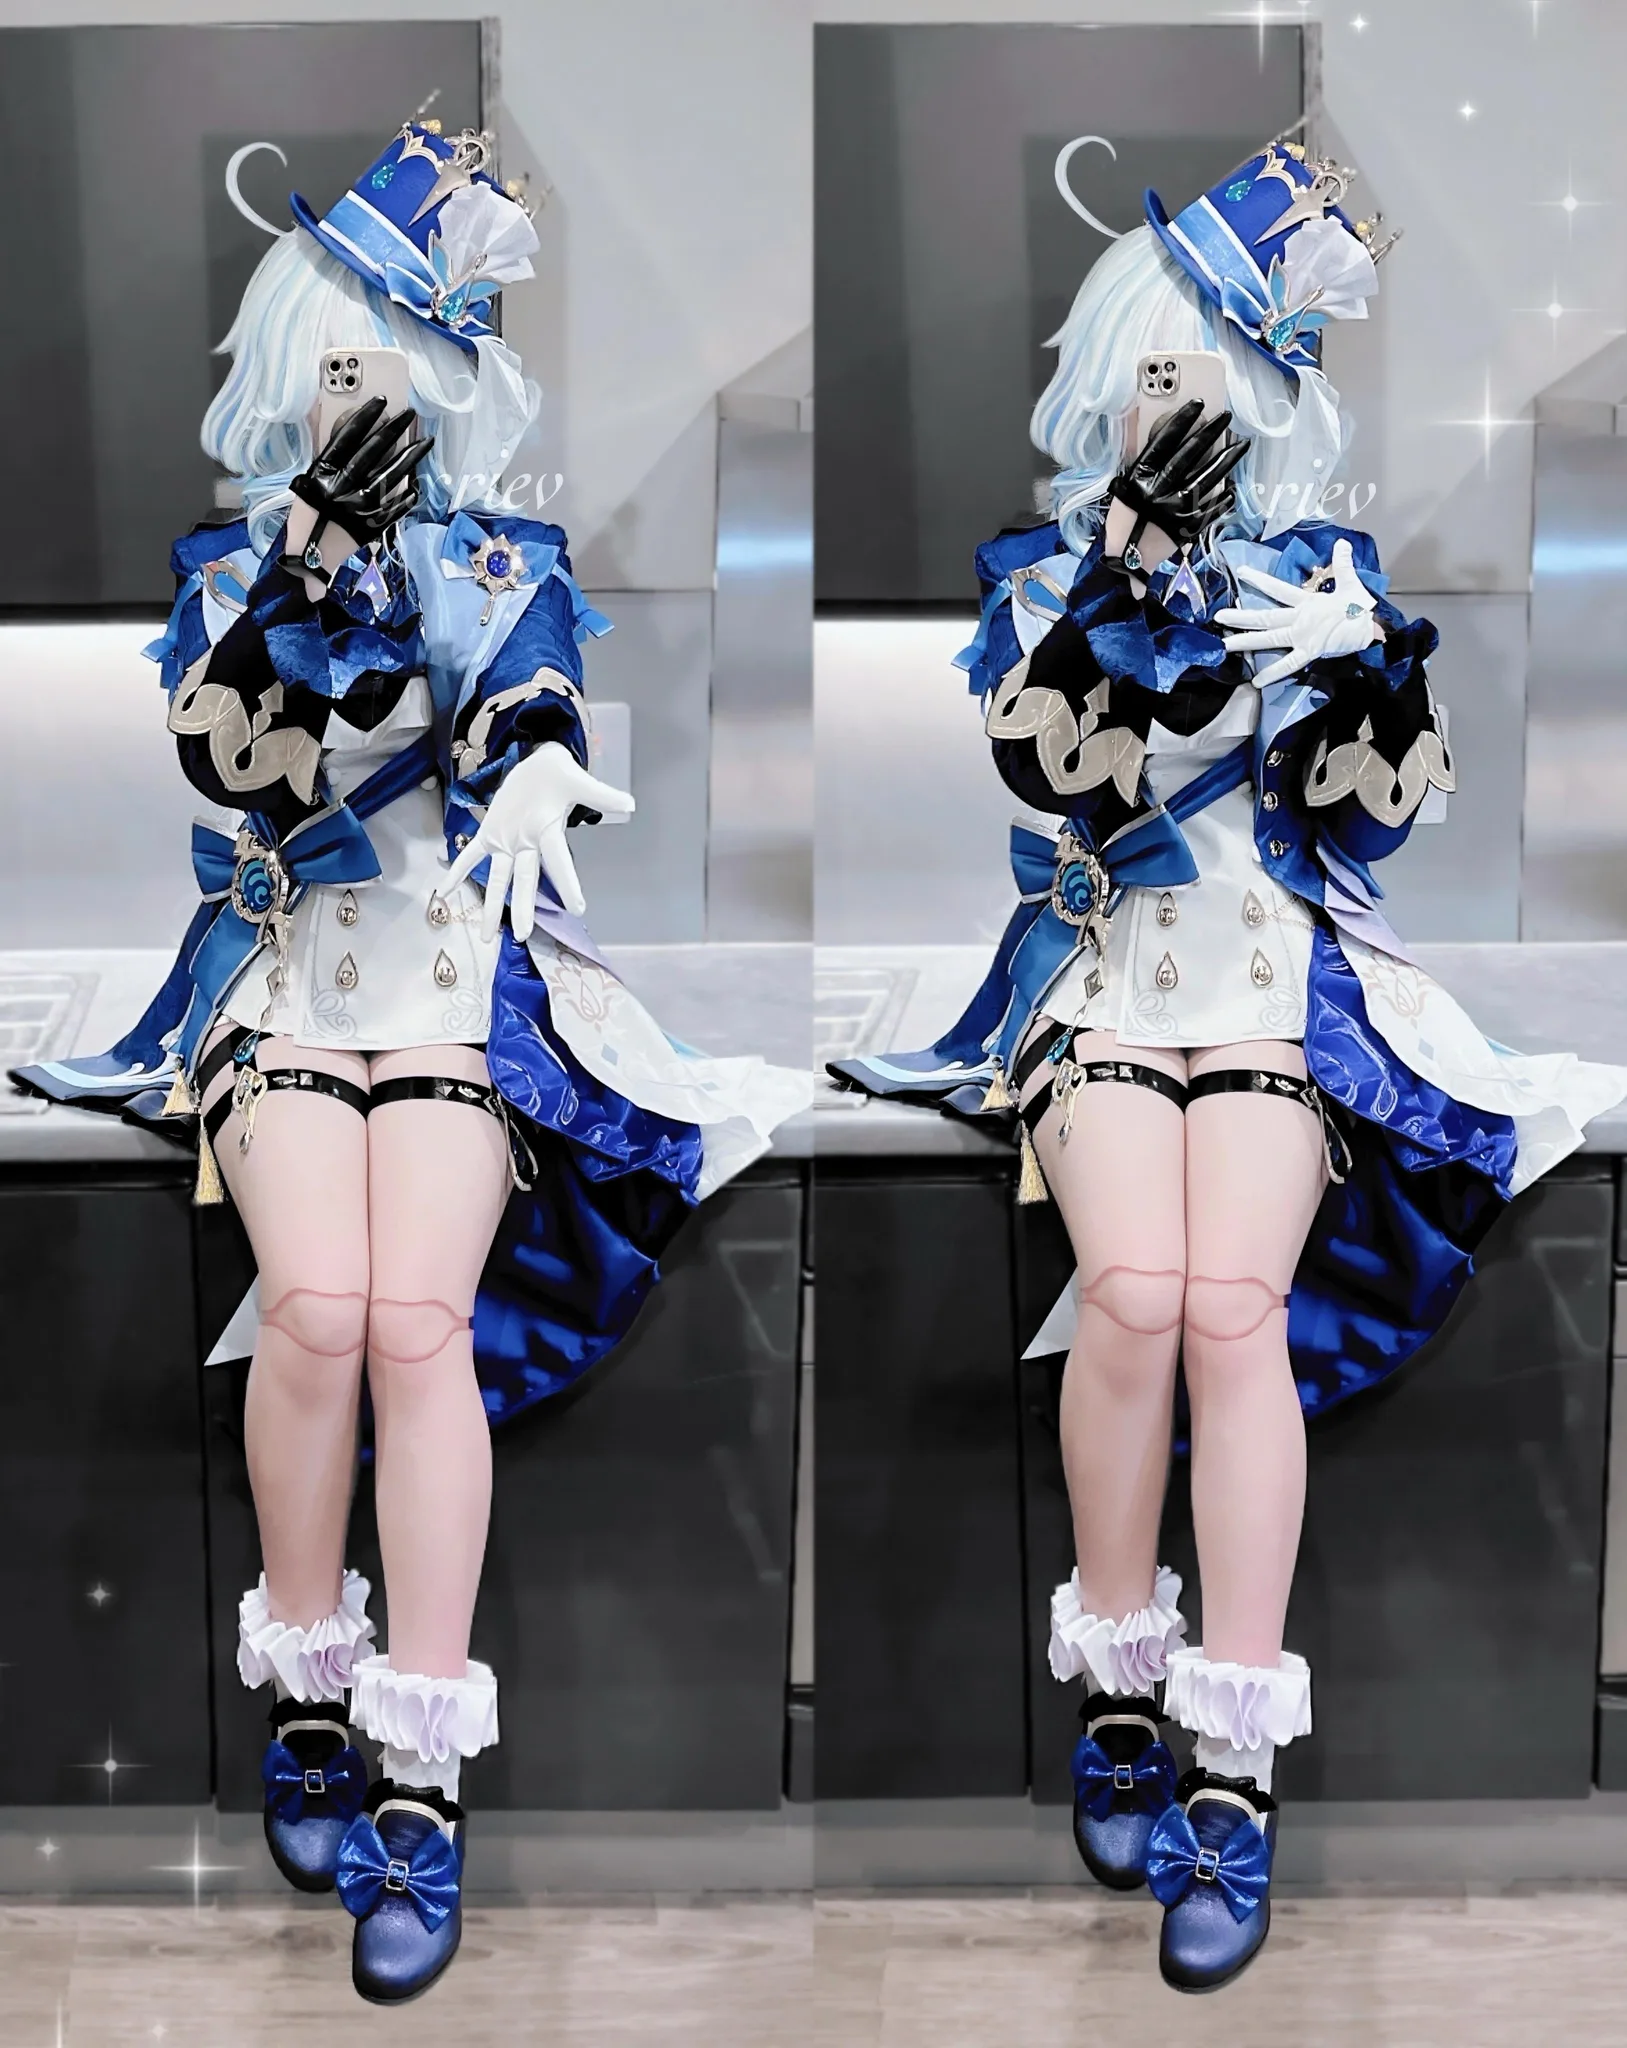
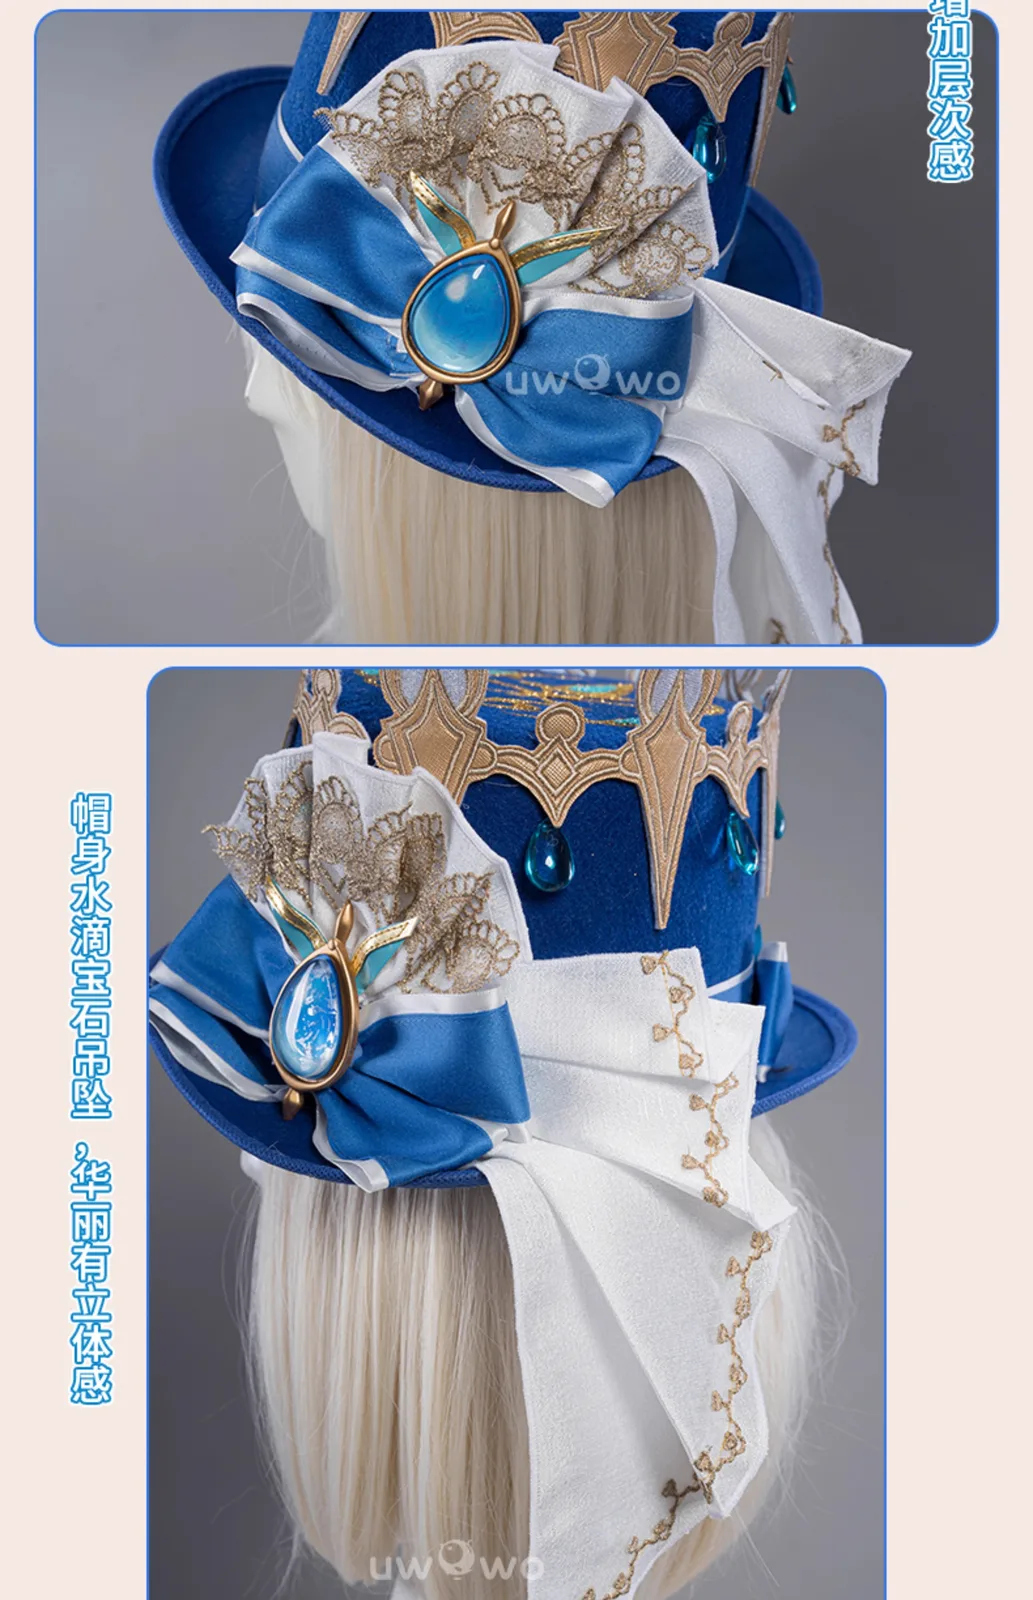
The hat is the build. I know that sounds dramatic for a costume with a full split-tail coat, a jabot collar, shorts, boots, a wig, and accessories (seven components total), but every Furina on the convention floor lives or dies by whether that top hat holds its shape, sits at the right tilted angle, and stays put through six hours of walking. You could sew a flawless coat and still look off if the hat is droopy or crooked. So I'm going to spend most of this guide on the hat, and you can check the milestones and reference board for the rest.
Cut your cylinder and brim from 1mm EVA foam sheet. It's stiff enough to hold the shape but light enough that your wig combs can support the weight. Cover the outside with blue satin or broadcloth, wrap clean, glue flat. For the gold band, I used 3/8" gold bias tape from the Joann in Glendale, CA, and the woman at the cutting counter told me bias tape sits flatter than ribbon on curved surfaces. She was right. Ribbon bunches at the cylinder seam. Bias tape follows the curve.
Attachment is the other half. Sew two or three mini wig combs to the inside of the brim so they grip into the wig's wefts (not just the hair, the actual wefts). Then add ribbon loops on the inside edge and pin through them with bobby pins using the X-method, two pins crossed under the wefts. I also dropped a penny inside the brim on the opposite side of the tilt for counterweight. Test it by shaking your head, looking down, bending over. If it shifts, add another anchor.
The coat is the second hardest piece. No off-the-rack jacket matches the split-tail silhouette, so you're sewing from a blazer pattern and drafting the tails separately. Buy all your blue suiting or gabardine from the same bolt (3 yards covers the coat, capelet, and shorts). Different bolts absorb dye differently, and mismatched blues show up in every photo. Interface the capelet shoulders lightly. Add small curtain weights inside the tail hems to keep them hanging straight.
For all the gold accents (coat edges, hat band, cuffs), use the same source material. I mixed ribbon and paint on my first build and ended up with three different golds. It looked like I'd assembled the costume from spare parts.
The jabot collar: chiffon or organza, gathered at a 2:1 ratio. Polyester satin makes the ruffle stick out like a bib instead of cascading. The drape is what reads "Rococo" from across the hall.
Wig, boots, and accessories are straightforward but eat budget. The gradient wig runs about $40. Factory highlight placement is usually wrong, so plan to move wefts. Wire the ahoge with floral wire, make it detachable for transport. The boots ($45) need a week of break-in. Opera gloves from a dancewear shop run $10 versus $25 for "cosplay" branded ones.
Total: $120 to $300 depending on fabric quality and whether you're printing accessories or buying them. About 6 weeks at a comfortable pace. It's an intermediate build. If you've sewn one garment before, you can handle this.
Components
Top hat with gold trim
Cape-coat with split tails
Ruffled jabot shirt
Shorts with overskirt detail
Heeled boots
Styled white-to-blue gradient wig
Accessories (vision, gloves, bows)
Materials list
13 itemsEstimated total cost
$120 - $300
Milestone timeline
6 weeks- 1
Gather Furina reference images and pick your version
Research
- 2
Buy and test the wig for color and fit
Materials
- 3
Draft or source the coat pattern with separate tails
Patterning
- 4
Cut and sew the coat body, capelet, and tails
Construction
- 5
Sew the shirt body and jabot collar with cascading ruffles
Construction
- 6
Sew the shorts and fit to measurements
Construction
- 7
Build the top hat from foam and cover with fabric
Construction
- 8
Add gold trim to coat edges, hat band, and cuffs
Details
- 9
Source or print the Hydro vision and paint it
Details
- 10
Wire the ahoge and style curls with highlight weft placement
Finishing
- 11
Attach hat to wig with combs or ribbon loops
Fitting
- 12
Source boots and break them in before the convention
Fitting
- 13
Gather remaining accessories (gloves, bows, pins)
Finishing
- 14
Full dress rehearsal with hat tilt test and walking check
Wear test
Frequently
asked questions.
Related tools and guides
Plan your build, estimate costs, and get ready.
Budget Calculator
Estimate your build cost before you start buying materials.
Convention Checklist
88-item packing checklist. Check off items as you pack.
Prop Scaling Calculator
Scale reference images to your body measurements.
How Much Does EVA Foam Armor Cost?
Real build budgets with specific products and dollar amounts.
Cosplay on Costumary
Templates, tools, and workspace built for cosplay makers.
Browse all templates
Explore build plans across 10 craft verticals.
Debut your cosplay build
Upcoming conventions where you could wear this. Dates, checklists, and budget tools included.
San Diego Comic-Con 2026
Jul 23–26 · San Diego, CA
The original and most iconic pop culture convention. Massive panels, Hall H, and the epicenter of entertainment announcements.
OffKai Expo 2026
Jul 24–26 · San Jose, CA
GalaxyCon Raleigh 2026
Jul 24–26 · Raleigh, NC
A Raleigh pop culture convention with celebrity guests, comic artists, and a growing cosplay scene.
Lakeland Anime-Fest 2026
Jul 25–25 · Lakeland, FL
Start this build free
Clone this template into your workspace. Track materials, milestones, budget, and build progress in one place.
More from this series
Qifrey Cosplay
5 weeks · 12 milestones
Qifrey's elegant white-robed silhouette is built around three signature elements: the tall pointed hat with the bent tip and black ribbon, the flowing white cape with the brass brooch closure, and the asymmetrical pince-nez glasses with one dark lens hiding his scarred eye. This is an intermediate build that needs more structural crafting than sewing. The hat and glasses demand the most attention, while the cape is a manageable garment project. The glasses and the hat are the make-or-break details, and this template walks you through both. Includes 7 components, 15 materials with cost estimates, a 12-step build plan, and a realistic 5-week, $95 to $280 budget.
Coco Cosplay
6 weeks · 12 milestones
Witch Hat Atelier's apprentice witch in her full outfit: the tall pointed hat with ornamental band, a dark cloak with decorative hem trim, a layered tunic-dress, boots, and her drawing implements. The hat is the signature piece and the hardest to get right. 7 components, 13 materials, ~6 weeks at $120-280.
Gojo Satoru Cosplay
5 weeks · 11 milestones
Jujutsu Kaisen's strongest sorcerer, built around three signature details: the black high-collar uniform jacket, the blindfold, and the white spiked hair. This is an intermediate build that leans on one well-made garment plus wig styling, so it reads instantly on the con floor without months of work. The collar and the wig are the make-or-break details, and this template walks you through both. Includes 6 components, 11 materials with cost estimates, an 11-step build plan, and a realistic 5-week, $90 to $240 budget.
Frieren Cosplay
5 weeks · 12 milestones
Frieren: Beyond Journey's End's elven mage, built around a white high-collar tunic with gold trim, a flowing blue cape, and a wooden staff with a red gem. This is an intermediate build that combines clean garment construction with prop craftsmanship, finished with styled twin-tail wig and elf ear prosthetics. The gold trim detailing and the staff are the signature details, and this template walks you through both. Includes 7 components, 14 materials with cost estimates, a 12-step build plan, and a realistic 5-week, $100 to $280 budget.