
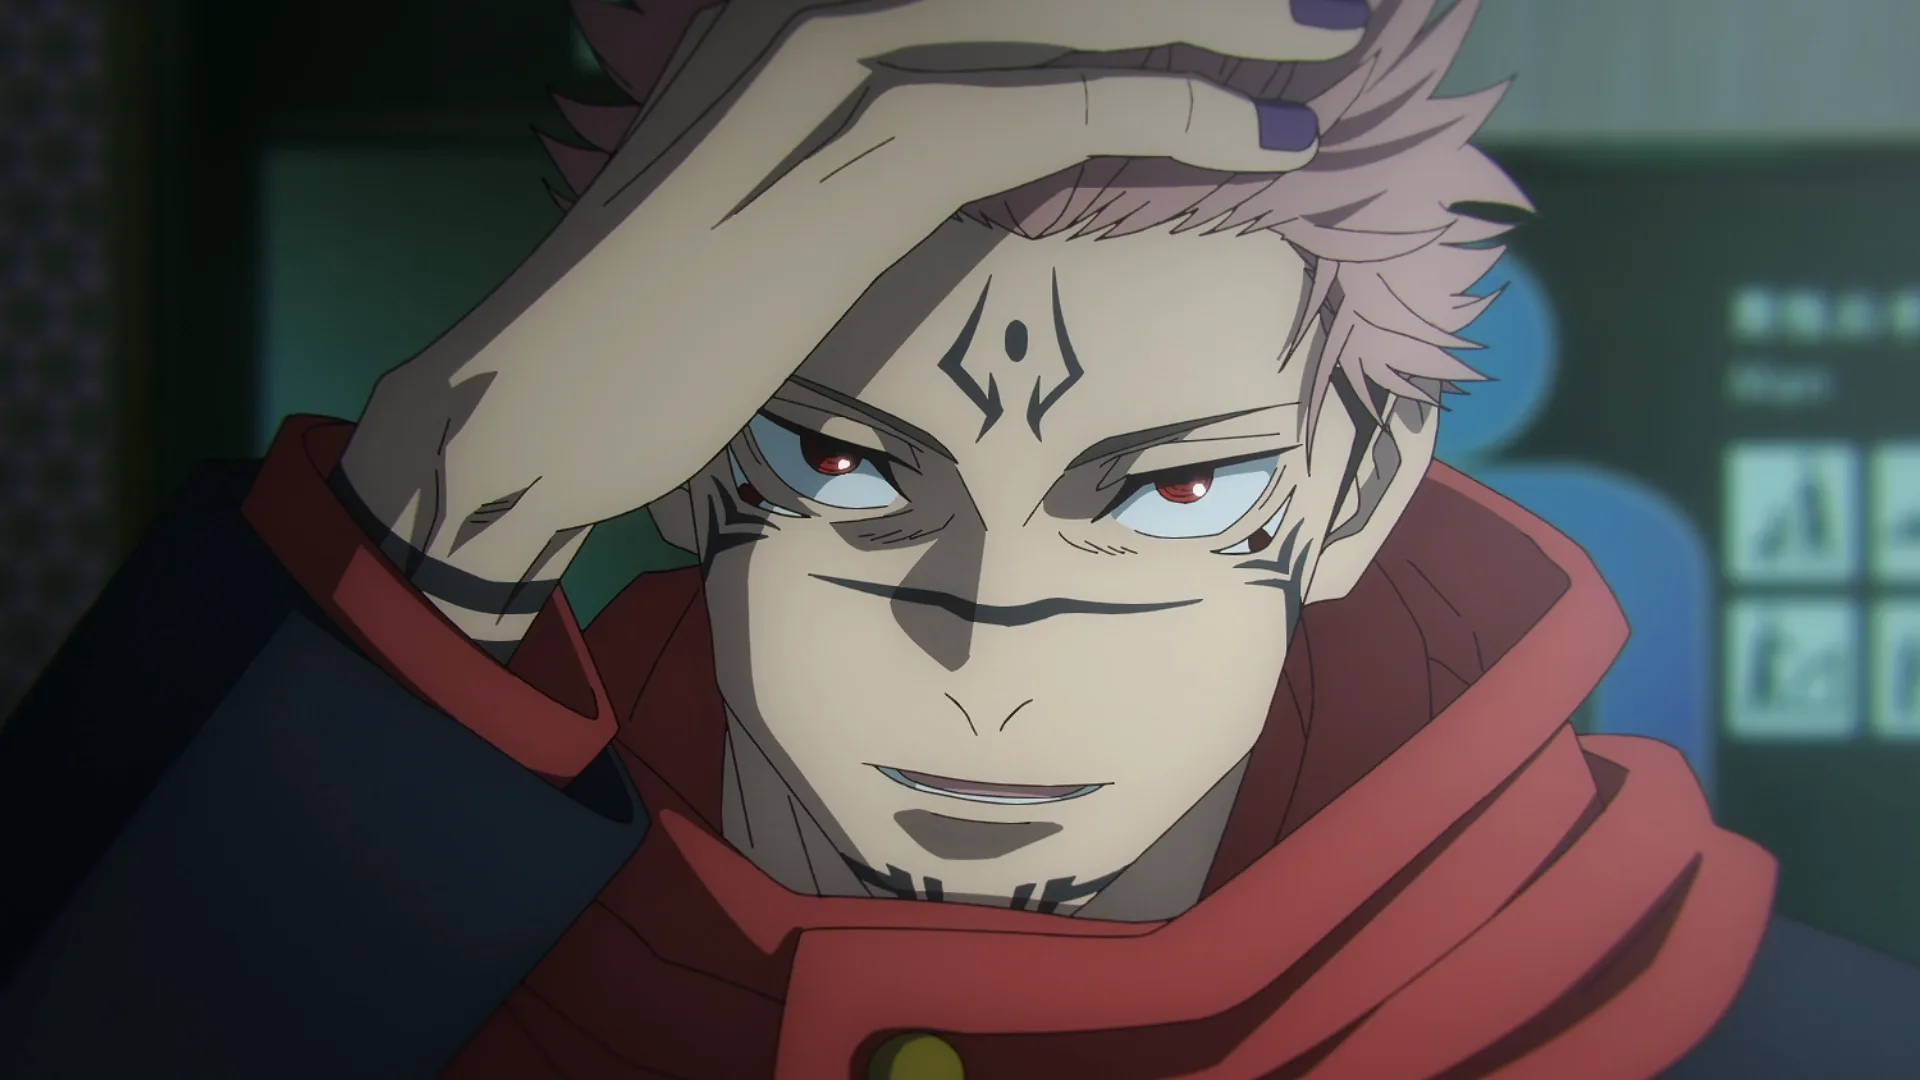
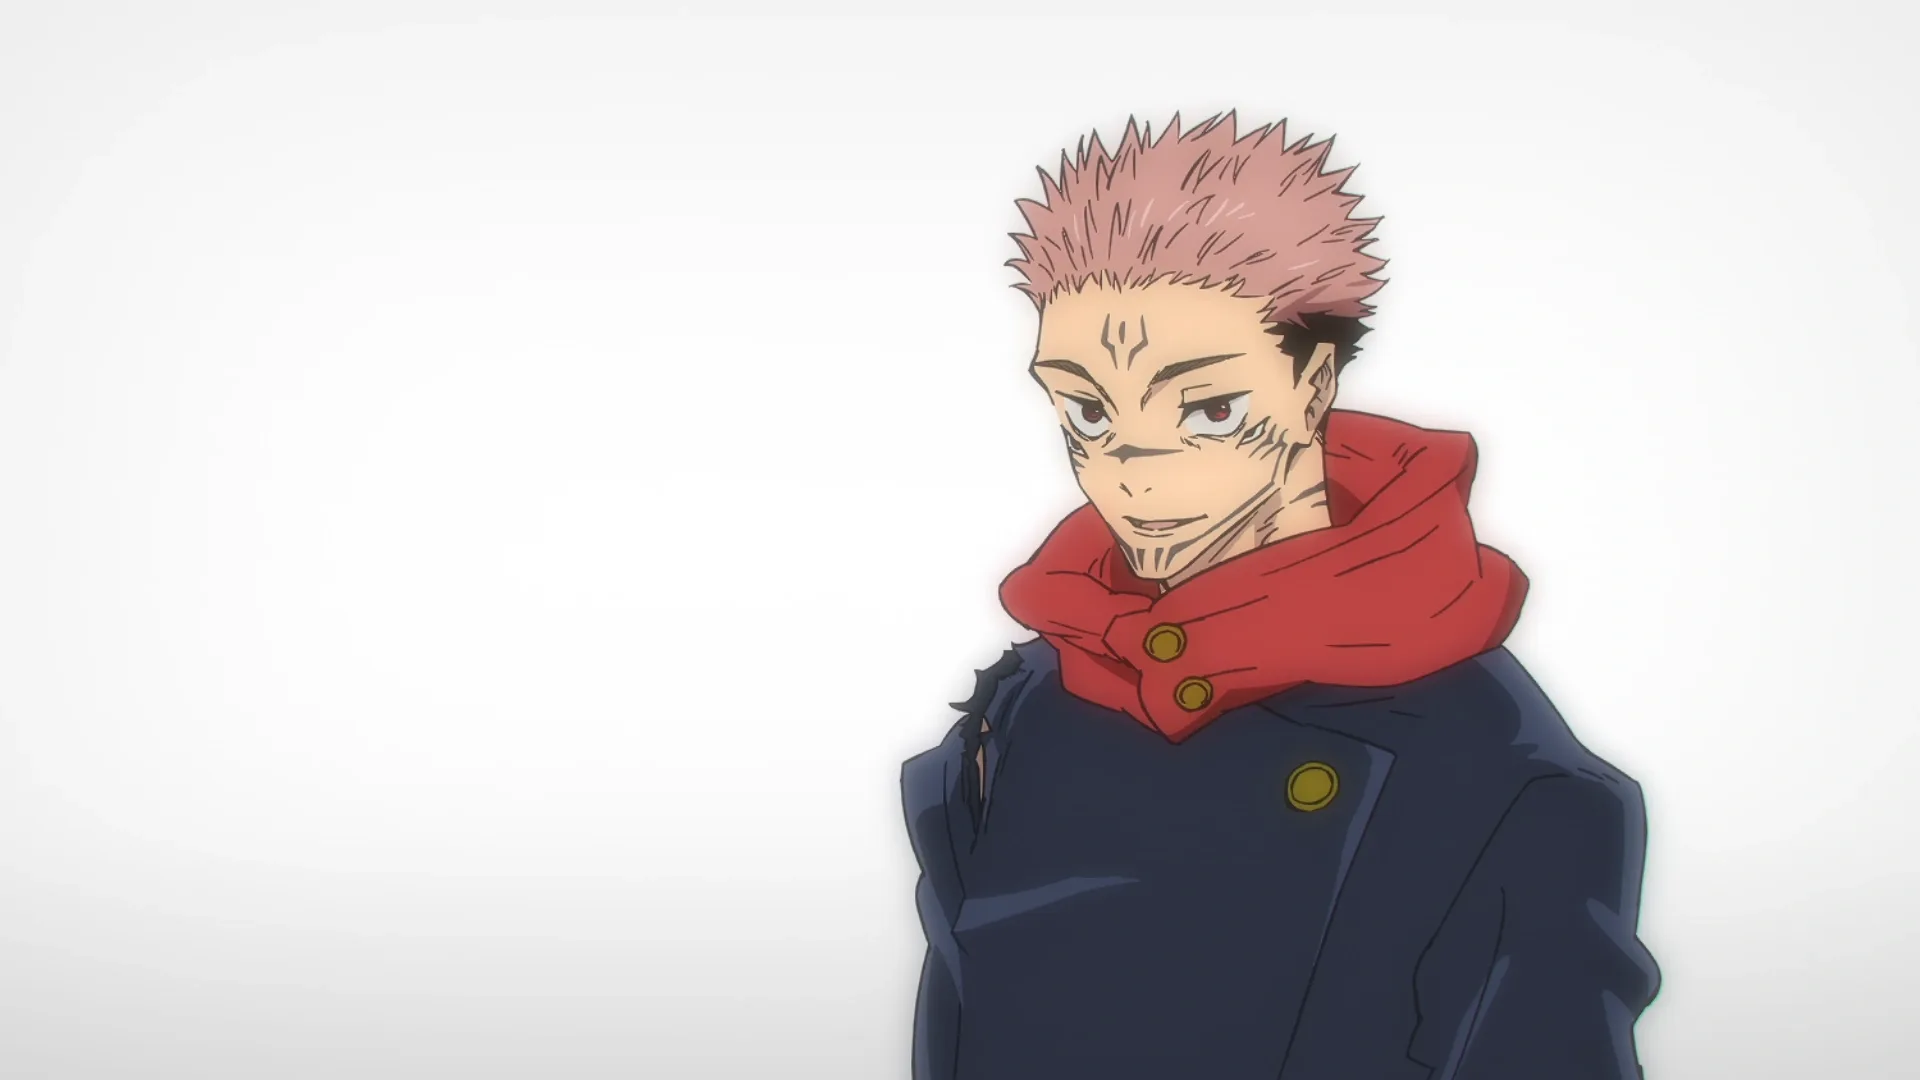
Ryomen Sukuna Cosplay
Jujutsu Kaisen's most powerful sorcerer and the series' primary antagonist: the deep red spiky hair, intricate facial tattoos, black standing-collar kimono with red flame patterns, and long black nails. A intermediate build requiring solid body paint application, wig styling, and garment construction. 6 components, 12 materials, ~6 weeks, $150-350.
6 weeks
14
12
6
See the whole look before you start.
References, materials, budget, and build order for Ryomen Sukuna.
Timeline
6 weeks
Color refs

Materials
12 items
Budget
$150 - $350
save the visual refs
Full reference board
The preview above is curated for scanning. This is the working board you clone into your own build, with notes, colors, product images, and extra references intact.
Images are sourced from around the internet to help you get started. Use the web clipper to build your own reference library.
Build guide
I'm going to spend the first half of this guide talking about body paint because it's where the build lives or dies. You can sew a flawless kimono, order the perfect wig, find the nails, and still walk around looking like you gave up halfway through if the paint isn't locked down properly. So here we go.
Sukuna's facial markings are the signature move. Two curved lines under each eye, a center forehead line that splits into two, and then the mouth area gets complicated with patterns that honestly vary depending on which episode you're looking at. Pick your reference frame and commit. The paint itself isn't the problem. Professional-grade acrylics from Kryolan or Mehron go on smooth, hold color, and dry in minutes. The problem is what happens next.
Sweat barrier primer. This is the difference between "I looked good for four hours" and "I looked good all day." Mehron's version is the standard, though Michael Davey Sweat Stop also works. You apply it to clean skin before the paint goes on, and it creates a moisture barrier that keeps sweat from breaking down the paint or causing it to pool and streak. Cost is fifteen dollars and it extends paint durability from about four hours to six or seven. Do the math on what that's worth to you at a convention.
Application is straightforward. Sketch the design with a makeup pencil first, then paint with thin brushes, building intensity rather than slapping it on heavy in one coat. Two to three thin coats look better than one thick coat, photograph better under con lighting, and are less likely to crack if you have to make an expression. The fixing spray comes after: Kryolan Aerosol is the professional standard. Light coats, 3-4 of them, with drying time between. Not misting the whole thing in one go. Building a shell.
Test this entire process on a friend's face at home. Get them in a warm room, apply the full setup—barrier, paint, fixing spray—and have them sit for two hours. Actually move around. Lean your head, talk, smile. If it stays crisp and doesn't streak, you know the method works. If it doesn't, adjust before the convention. You'll know which component failed by watching the degradation.
Now the kimono. The standing collar is the make-or-break garment detail, and I'm serious about this. A limp, droopy collar that won't stand upright makes the entire costume read as a cheap knockoff, no matter how good the paint is. You need heavy-weight fusible interfacing. Pellon makes a 20-ounce product that's standard for this. Cut two collar pieces from your pattern, two from the interfacing, fuse the interfacing to the wrong side of each piece, then construct the collar as normal. The interfacing makes it stand on its own without needing hidden support wires or a rigid backing.
Test this on scrap fabric first. Different fabrics interact with interfacing differently. A light cotton might need the 20-ounce pellon. A heavier twill might need less. You'll figure out what weight holds the shape you need without buckling or looking stiff. Then you can commit to cutting your fashion fabric.
The main body of the kimono is just fabric construction. Black cotton or a cotton-poly blend photographs better than pure polyester because polyester absorbs light like a void and looks cheap in photos. Budget thirty-five to forty dollars for the fabric, and don't cheap out here because it's what shows on camera for the entire con. The flame patterns on the hem and edges can be done with fabric paint or appliqué. Fabric paint ($15 for a decent set) is faster and gives you more control over the design. Appliqué is more time-intensive but reads more dramatically at a distance.
The red haori (outer robe) is simple: basically a rectangle with sleeves and minimal shaping. Use the same fabric quality consideration as the base kimono. If you're running short on time, you can skip it entirely and the cosplay still works. Costume hierarchy.
Wig. Order pre-styled from a specialist vendor with a custom note for Sukuna's specific style. You want pre-spiky because reshaping a long wig yourself takes eight to ten hours and you risk heat-damaging the fibers if you use a heat gun (which you should never do anyway). A hair straightener on LOW heat with Got2b Glued styling gel is the only safe heat-shaping method for synthetic fibers, and it's finicky. Pre-styled avoids the whole problem. Cost is sixty-five to eighty dollars and it arrives ready to wear.
Hairline is trickier than styling. The seam where the wig cap meets your forehead needs to disappear. You can use makeup to blend it, or apply temporary hair tattoos for a cleaner, lower-effort result. Practice this three to four times at home before wearing it to the con. A bad hairline is what makes a good wig look cheap.
Nails: order custom Sukuna press-ons from an Etsy designer who specializes in anime cosplay nails. Twenty dollars and they arrive ready to wear, properly sized, properly designed. DIY acrylics take hours and often don't look as sharp as a professional set. Press-ons are glue-on or tab-on, reusable across multiple wears, and you can remove them if your hands get sore during the con. Test-wear them at home for two hours to make sure the size is right and nothing catches or pinches.
Timeline is six weeks if you're intermediate at sewing and cosplay construction. That's not aggressive. The collar testing alone can take a week if you get it wrong the first time, and you want to avoid that by testing on scrap. Paint application will take at least four hours of practice before you're confident enough to do it in public. Wig comes pre-done but you still need to test it with the whole costume to make sure the proportions look right on your specific body.
Con day strategy: the full costume with paint, wig, nails, and layered garments is wearable for about four to five hours comfortably. After that, heat accumulation and paint fatigue set in. Plan for photo ops and hall walks in that window. Then change into casual clothes or just the under-shirt for the rest of the day. The paint will have started to break down anyway, and clinging to the full look for eight hours is how you end up miserable and looking worse than you did at hour three.
Total cost lands at 150 to 350 depending on fabric quality choices and whether you buy the red haori. Low end means thrift the under-shirt, use mid-range fabrics, and skip the cloak. High end means all new, nicer fabrics, and quality thread throughout.
One final thing. Professional. That's what separates the builds that rank high at competitions from the ones that don't. Not difficulty. Not time invested. Professional execution at the level of what the character would actually wear. Everything you do should be asking: would Sukuna himself approve of the craftsmanship? If the answer is no, fix it.
Components
Facial tattoo markings (body paint)
Deep red spiky wig
Black standing-collar kimono with flame patterns
Black nails (press-on or acrylic)
Red haori (outer robe/cloak)
Footwear and undershirt
Materials list
12 itemsEstimated total cost
$150 - $350
Milestone timeline
6 weeks- 1
Gather reference images and decide on costume version (standard or Heian era)
Research
- 2
Order heat-resistant spiky wig with custom Sukuna styling notes
Materials
- 3
Purchase body paint, sweat barrier primer, and fixing spray; test on a small area of skin
Materials
- 4
Order or source custom Sukuna press-on nails
Materials
- 5
Source or draft a standing-collar kimono pattern
Patterning
- 6
Test the standing collar structure on scrap fabric with heavy interfacing
Patterning
- 7
Cut and sew the black kimono main body
Construction
- 8
Interface and attach the standing collar
Construction
- 9
Add red flame pattern details via fabric paint or appliqué
Finishing
- 10
Cut and sew the red haori outer robe
Construction
- 11
Practice facial tattoo application on paper or test face; refine the design
Finishing
- 12
Style and test-wear the wig with the costumes to check proportions
Finishing
- 13
Full wear test in warm conditions: body paint durability, sweat resistance, wig stability, movement comfort
Wear test
- 14
Test nails for 2-3 hours to ensure comfort and functionality with props
Wear test
Frequently
asked questions.
Related tools and guides
Plan your build, estimate costs, and get ready.
Budget Calculator
Estimate your build cost before you start buying materials.
Convention Checklist
88-item packing checklist. Check off items as you pack.
Prop Scaling Calculator
Scale reference images to your body measurements.
How Much Does EVA Foam Armor Cost?
Real build budgets with specific products and dollar amounts.
Cosplay on Costumary
Templates, tools, and workspace built for cosplay makers.
Browse all templates
Explore build plans across 10 craft verticals.
Debut your cosplay build
Upcoming conventions where you could wear this. Dates, checklists, and budget tools included.
Start this build free
Clone this template into your workspace. Track materials, milestones, budget, and build progress in one place.
More from this series
Qifrey Cosplay
5 weeks · 12 milestones
Qifrey's elegant white-robed silhouette is built around three signature elements: the tall pointed hat with the bent tip and black ribbon, the flowing white cape with the brass brooch closure, and the asymmetrical pince-nez glasses with one dark lens hiding his scarred eye. This is an intermediate build that needs more structural crafting than sewing. The hat and glasses demand the most attention, while the cape is a manageable garment project. The glasses and the hat are the make-or-break details, and this template walks you through both. Includes 7 components, 15 materials with cost estimates, a 12-step build plan, and a realistic 5-week, $95 to $280 budget.
Coco Cosplay
6 weeks · 12 milestones
Witch Hat Atelier's apprentice witch in her full outfit: the tall pointed hat with ornamental band, a dark cloak with decorative hem trim, a layered tunic-dress, boots, and her drawing implements. The hat is the signature piece and the hardest to get right. 7 components, 13 materials, ~6 weeks at $120-280.
Gojo Satoru Cosplay
5 weeks · 11 milestones
Jujutsu Kaisen's strongest sorcerer, built around three signature details: the black high-collar uniform jacket, the blindfold, and the white spiked hair. This is an intermediate build that leans on one well-made garment plus wig styling, so it reads instantly on the con floor without months of work. The collar and the wig are the make-or-break details, and this template walks you through both. Includes 6 components, 11 materials with cost estimates, an 11-step build plan, and a realistic 5-week, $90 to $240 budget.
Denji Cosplay
10 weeks · 15 milestones
Chainsaw Man's protagonist in his iconic hybrid form: the human body with a chainsaw head and transformable chainsaw arms. The hand-carved foam helmet with chain-link detailing is the make-or-break piece, demanding precision foam work and 8-12 weeks of dedicated building. A full build includes the school uniform base, prosthetic teeth, spiky hair, and the chainsaw arms or helmet. 6 components, 14 materials, ~10 weeks, $200-500.