
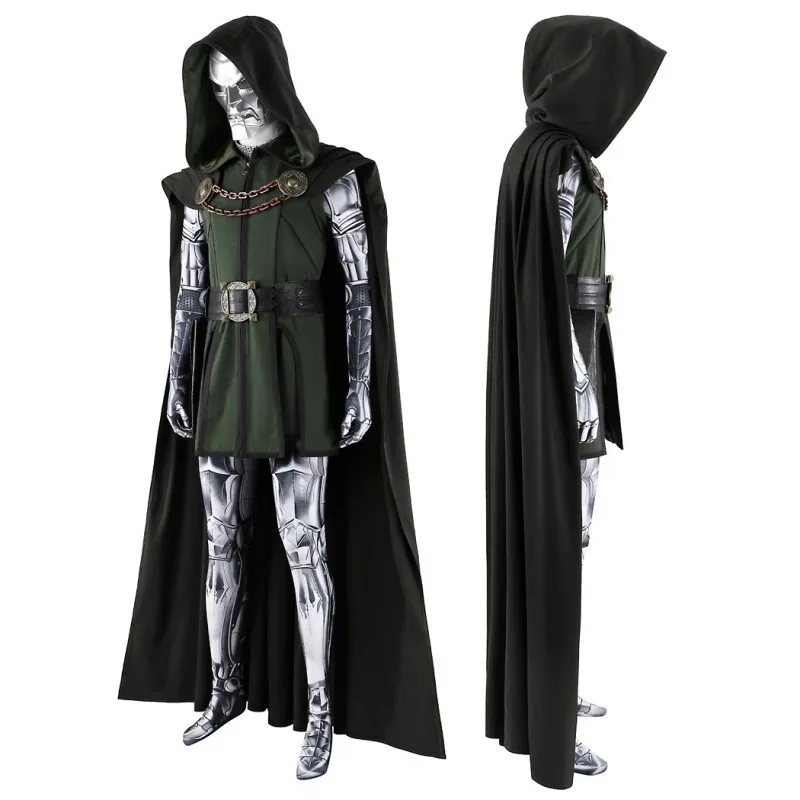
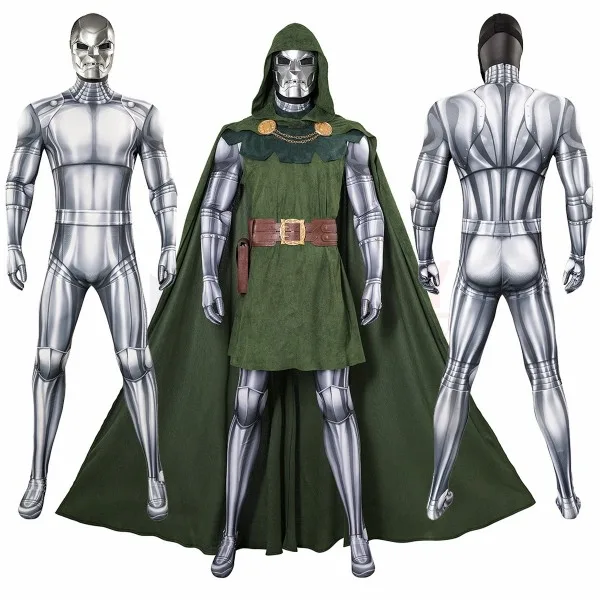
Doctor Doom Cosplay
Marvel's greatest villain in his iconic green cloak and metal mask: a full armor build with a custom EVA foam mask, sculpted chest and shoulder plates, structured green hood, and gold gauntlets. This is an advanced project spanning foam shaping, armor attachment systems, and precision painting. 6 components, 14 materials, ~7 weeks, $180-420 budget.
7 weeks
15
14
6
See the whole look before you start.
References, materials, budget, and build order for Doctor Doom.
Timeline
7 weeks
Color refs


Materials
14 items
Budget
$180 - $420
save the visual refs
Full reference board
The preview above is curated for scanning. This is the working board you clone into your own build, with notes, colors, product images, and extra references intact.
Images are sourced from around the internet to help you get started. Use the web clipper to build your own reference library.
Build guide
I ruined my first attempt at this costume. The mask. I spent three weeks carving EVA foam without testing it on my head, and when I finally tried it on at the fitting stage, the thing weighed four pounds and restricted my vision so badly I walked into a doorframe in my own garage. Worse was realizing I'd locked myself into a dead end because the entire costume was designed around that bad mask, so I had to start over on the armor.
So here's the primary constraint of a Doctor Doom build, and I won't bury it: the mask makes or breaks everything. Not accuracy. Wearability. You need a mask that weighs under two pounds, doesn't fog up your vision, and won't give you a tension headache after an hour. That's the technical problem you're solving, and everything else (the cloak, the armor, the boots) is supporting that one difficult piece. Build the mask as two separate components. A carved EVA foam skull base that you sculpt from reference images, maybe 10mm thickness for structure, tapering down to 6mm at the cheekbones and eye sockets for weight. Layer Worbla thermoplastic over the carved foam to create hard plating surfaces. Worbla looks metallic when you heat it and it holds detail without flexing, so you're not fighting foam instability while trying to get geometry right.
Test-fit constantly. Measure your eye line, mark where your pupils sit, and cut those openings larger than the reference art shows. I know that sounds wrong. Do it anyway. You need functional vision, not museum-piece accuracy. Add mesh fabric behind the eye openings so the mask still reads as a hard surface from the audience view, but you can actually see the convention floor. The chin strap is where people fail. A single neck attachment point will destroy you within an hour. Build a harness. Route straps over your shoulders, distribute the weight across your upper back and torso. I used paracord threaded through a padded neck collar, connected to a suspender-style back strap attached to the undersuit at the shoulders and lower back. Inexpensive. Effective. It's the difference between a costume you can wear for six hours and one you're ripping off after thirty minutes.
Magnetic detachment. This saved Anime Expo. The back of the mask has neodymium magnets embedded in Apoxie Sculpt, so you can pull the mask off and clip it to your gear bag during con breaks. The hood stays in place as a separate padded backing. This design choice removes 40% of the total weight from your head and neck during downtime. Your vision fogged constantly in that cooling hall last year, and the magnetic system let me pull the whole thing off for five minutes without destroying the costume structure.
The cloak and hood will take as long as the mask, maybe longer. Don't use cheap fleece. Cotton canvas, linen blend, something with actual drape weight. Heavyweight. You're dyeing the whole thing forest green (hex #1B4D2C) in one batch for color consistency. Structure the hood with buckram or millinery wire so it frames your face without relying on the mask to hold its shape. Add lead weights to the cloak hem so it doesn't float up when you walk. The armor plates are easy by comparison. EVA foam, Worbla overlays, Flexbond sealer, metallic paint. Layer the foam for dimension instead of trying to carve everything from a single block. Six weeks if you're disciplined. Seven if you're normal.
Components
Metal face mask with integrated hood
Green cloak and structured hood
Chest and shoulder armor plates
Gold gauntlets with hand plates
Leg armor and boot covers
Undersuit attachment system and closures
Materials list
14 itemsEstimated total cost
$180 - $420
Milestone timeline
7 weeks- 1
Gather high-resolution reference images from multiple angles (comics, MCU, video games)
Research
- 2
Scale all reference images to 1:1 and create cardboard mock-ups of key pieces
Research
- 3
Sculpt and test-fit the mask base on a foam head form
Patterning
- 4
Draft the cloak pattern, source fabric, and begin dyeing to the correct green
Materials
- 5
Carve detailed mask shape from EVA foam, test vision and weight distribution
Construction
- 6
Apply Worbla plating to mask and seal with Flexbond
Construction
- 7
Construct the separate hood piece with buckram framing and lining
Construction
- 8
Sew the full cloak and attach hood, add lead weights to hem
Construction
- 9
Cut and shape chest, shoulder, and leg armor pieces from EVA foam
Construction
- 10
Apply Worbla details and panel lines to all armor plates
Construction
- 11
Prime all foam pieces with Flexbond (multiple coats)
Finishing
- 12
Paint mask plates with gunmetal or silver metallic, armor with gold accents
Finishing
- 13
Source and break in red boots, optionally add armor details to boot covers
Finishing
- 14
Create black spandex undersuit and attach velcro landing pads for all armor pieces
assembly
- 15
Assemble all pieces, test mobility, walking, sitting, and arm movement
Wear test
Frequently
asked questions.
Related tools and guides
Plan your build, estimate costs, and get ready.
Budget Calculator
Estimate your build cost before you start buying materials.
Convention Checklist
88-item packing checklist. Check off items as you pack.
Prop Scaling Calculator
Scale reference images to your body measurements.
How Much Does EVA Foam Armor Cost?
Real build budgets with specific products and dollar amounts.
Cosplay on Costumary
Templates, tools, and workspace built for cosplay makers.
Browse all templates
Explore build plans across 10 craft verticals.
Debut your cosplay build
Upcoming conventions where you could wear this. Dates, checklists, and budget tools included.
Start this build free
Clone this template into your workspace. Track materials, milestones, budget, and build progress in one place.
More from this series
Qifrey Cosplay
5 weeks · 12 milestones
Qifrey's elegant white-robed silhouette is built around three signature elements: the tall pointed hat with the bent tip and black ribbon, the flowing white cape with the brass brooch closure, and the asymmetrical pince-nez glasses with one dark lens hiding his scarred eye. This is an intermediate build that needs more structural crafting than sewing. The hat and glasses demand the most attention, while the cape is a manageable garment project. The glasses and the hat are the make-or-break details, and this template walks you through both. Includes 7 components, 15 materials with cost estimates, a 12-step build plan, and a realistic 5-week, $95 to $280 budget.
Coco Cosplay
6 weeks · 12 milestones
Witch Hat Atelier's apprentice witch in her full outfit: the tall pointed hat with ornamental band, a dark cloak with decorative hem trim, a layered tunic-dress, boots, and her drawing implements. The hat is the signature piece and the hardest to get right. 7 components, 13 materials, ~6 weeks at $120-280.
Gojo Satoru Cosplay
5 weeks · 11 milestones
Jujutsu Kaisen's strongest sorcerer, built around three signature details: the black high-collar uniform jacket, the blindfold, and the white spiked hair. This is an intermediate build that leans on one well-made garment plus wig styling, so it reads instantly on the con floor without months of work. The collar and the wig are the make-or-break details, and this template walks you through both. Includes 6 components, 11 materials with cost estimates, an 11-step build plan, and a realistic 5-week, $90 to $240 budget.
Denji Cosplay
10 weeks · 15 milestones
Chainsaw Man's protagonist in his iconic hybrid form: the human body with a chainsaw head and transformable chainsaw arms. The hand-carved foam helmet with chain-link detailing is the make-or-break piece, demanding precision foam work and 8-12 weeks of dedicated building. A full build includes the school uniform base, prosthetic teeth, spiky hair, and the chainsaw arms or helmet. 6 components, 14 materials, ~10 weeks, $200-500.