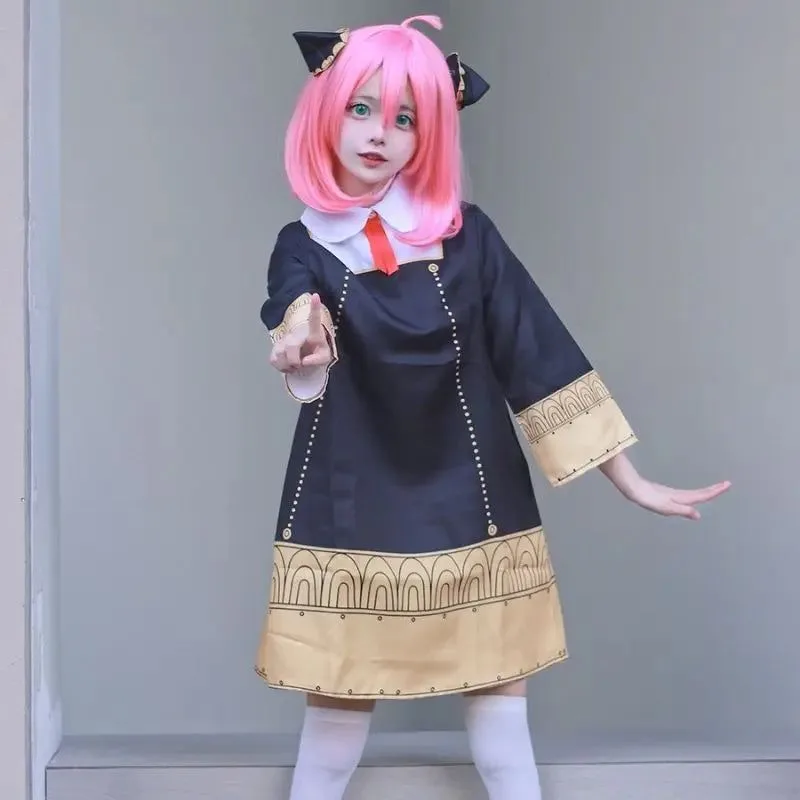
Anya Forger Cosplay
Spy x Family's telepathic kid in the Eden Academy uniform. The build is a black A-line dress with gold scalloped trim, a white Peter Pan collar, a red bow, and a pink wig with horn clips. It looks simple, but the wig quality, horn stability, and trim finish are where beginners hit walls. This template covers 6 components, 10 materials, a 10-step build plan, and a $40 to $120 budget across 3 weeks.
3 weeks
11
13
6
See the whole look before you start.
References, materials, budget, and build order for Anya Forger.
Timeline
3 weeks
Color refs


Materials
13 items
Budget
$40 - $120
save the visual refs
Full reference board
The preview above is curated for scanning. This is the working board you clone into your own build, with notes, colors, product images, and extra references intact.
Images are sourced from around the internet to help you get started. Use the web clipper to build your own reference library.
Build guide
Order the wig first. Before you buy the dress, before you think about trim, before anything. The wig controls your entire timeline because if the color is wrong or it sheds like a golden retriever in July, you need time to return it and reorder.
I've built this costume twice. The first time I grabbed a $12 pink wig off Amazon and it looked fine in the listing photo. Under the fluorescent lights at Anime NYC in November it read almost lavender. Totally wrong. The second time I spent $25 on a mid-range pastel pink from Arda Wigs and the difference was night and day. Thicker fibers, less shedding, and the color actually held under convention lighting. That $13 upgrade saved the whole build.
When your wig arrives, put it on a stand and comb it out from the ends with a wide-tooth comb. Never start from the root. If fibers are coming out in clumps after a gentle pass, send it back. A good wig will shed a little, like a few strands per comb. A bad wig will leave a pile on your bathroom counter. Trim the bangs yourself with sharp fabric scissors, cutting at a slight angle so they don't look blunt. Anya's bangs sit just above the eyebrows with that slightly choppy look. Don't overthink it. Slightly messy is actually more accurate to the character.
The horns are the other piece that trips people up. EVA foam is the way to go here, lighter and cheaper than 3D-printed. Cut your shapes, sand the edges smooth, paint them to match the wig color, then attach them with alligator clips. Two clips per horn, not one. And sew the clips to the foam base with thick upholstery thread instead of hot gluing them. I glued my first pair and one horn popped off during a photo op at Otakon. Embarrassing. The sewn clips have survived three cons since.
The dress itself is the easy part. Buy a plain black A-line dress from a thrift store or Amazon for $10-20 and modify it. I found mine at the Goodwill on Hawthorne in Portland for $8. Sewing from scratch is overkill for a beginner build.
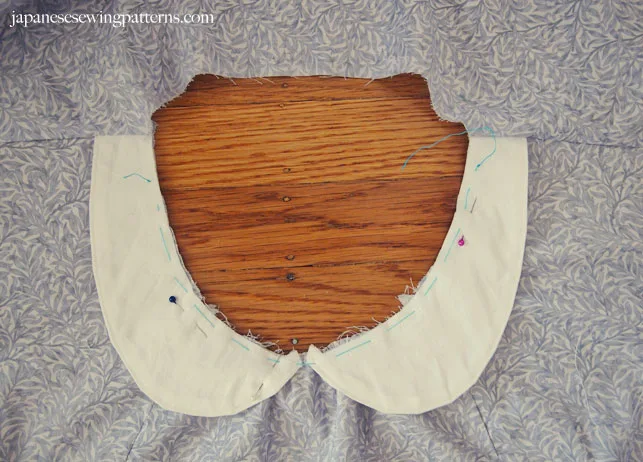
Layer a detachable Peter Pan collar over the neckline. Interface it with lightweight fusible so it holds its shape and stays crisp white. Iron or starch it the morning of the con. For the bow, tie real red satin ribbon into a proper bow and pin it from behind with a safety pin. The floppy bows that ship with costume sets look terrible by lunchtime.
The gold trim is the detail that separates a good Anya from a great one. Swap out any shiny included ribbon for matte gold scalloped bias tape on the cuffs and hem. Matte gold photographs so much better under flash. This single swap is maybe the highest-impact change you can make for under $8.
Budget runs $40 to $120 depending on whether you thrift the dress and shoes or buy new. Three weekends is plenty of time. Spend the first weekend on wig testing and dress sourcing, the second on collar and trim, and the third on horns and a full wear test. Walk around your apartment in the complete outfit for at least 30 minutes before con day. You'll find every loose clip and droopy collar before it matters.
Components
Black A-line school dress
White Peter Pan collar and red bow
Gold scalloped trim
Pink wig with styled bangs
Horn hair clips
Black tights and shoes
Materials list
13 itemsEstimated total cost
$40 - $120
Milestone timeline
3 weeks- 1
Gather references and lock the uniform details
Research
- 2
Buy and test the wig, check color and shedding
Materials
- 3
Source or buy the black dress base
Materials
- 4
Fit and alter the dress for adult proportions
Fitting
- 5
Make or attach the Peter Pan collar
Construction
- 6
Attach gold trim to cuffs and hem
Construction
- 7
Tie and secure the red bow
Details
- 8
Build or buy the horn clips
Construction
- 9
Trim bangs and style the wig
Finishing
- 10
Test horn attachment on the wig
Finishing
- 11
Full suit-up and con-day wear test
Wear test
Frequently
asked questions.
Related tools and guides
Plan your build, estimate costs, and get ready.
Budget Calculator
Estimate your build cost before you start buying materials.
Convention Checklist
88-item packing checklist. Check off items as you pack.
Prop Scaling Calculator
Scale reference images to your body measurements.
How Much Does EVA Foam Armor Cost?
Real build budgets with specific products and dollar amounts.
Cosplay on Costumary
Templates, tools, and workspace built for cosplay makers.
Browse all templates
Explore build plans across 10 craft verticals.
Debut your cosplay build
Upcoming conventions where you could wear this. Dates, checklists, and budget tools included.
San Diego Comic-Con 2026
Jul 23–26 · San Diego, CA
The original and most iconic pop culture convention. Massive panels, Hall H, and the epicenter of entertainment announcements.
OffKai Expo 2026
Jul 24–26 · San Jose, CA
GalaxyCon Raleigh 2026
Jul 24–26 · Raleigh, NC
A Raleigh pop culture convention with celebrity guests, comic artists, and a growing cosplay scene.
Lakeland Anime-Fest 2026
Jul 25–25 · Lakeland, FL
Start this build free
Clone this template into your workspace. Track materials, milestones, budget, and build progress in one place.
More from this series
Qifrey Cosplay
5 weeks · 12 milestones
Qifrey's elegant white-robed silhouette is built around three signature elements: the tall pointed hat with the bent tip and black ribbon, the flowing white cape with the brass brooch closure, and the asymmetrical pince-nez glasses with one dark lens hiding his scarred eye. This is an intermediate build that needs more structural crafting than sewing. The hat and glasses demand the most attention, while the cape is a manageable garment project. The glasses and the hat are the make-or-break details, and this template walks you through both. Includes 7 components, 15 materials with cost estimates, a 12-step build plan, and a realistic 5-week, $95 to $280 budget.
Coco Cosplay
6 weeks · 12 milestones
Witch Hat Atelier's apprentice witch in her full outfit: the tall pointed hat with ornamental band, a dark cloak with decorative hem trim, a layered tunic-dress, boots, and her drawing implements. The hat is the signature piece and the hardest to get right. 7 components, 13 materials, ~6 weeks at $120-280.
Gojo Satoru Cosplay
5 weeks · 11 milestones
Jujutsu Kaisen's strongest sorcerer, built around three signature details: the black high-collar uniform jacket, the blindfold, and the white spiked hair. This is an intermediate build that leans on one well-made garment plus wig styling, so it reads instantly on the con floor without months of work. The collar and the wig are the make-or-break details, and this template walks you through both. Includes 6 components, 11 materials with cost estimates, an 11-step build plan, and a realistic 5-week, $90 to $240 budget.
Frieren Cosplay
5 weeks · 12 milestones
Frieren: Beyond Journey's End's elven mage, built around a white high-collar tunic with gold trim, a flowing blue cape, and a wooden staff with a red gem. This is an intermediate build that combines clean garment construction with prop craftsmanship, finished with styled twin-tail wig and elf ear prosthetics. The gold trim detailing and the staff are the signature details, and this template walks you through both. Includes 7 components, 14 materials with cost estimates, a 12-step build plan, and a realistic 5-week, $100 to $280 budget.