
Kafka Cosplay
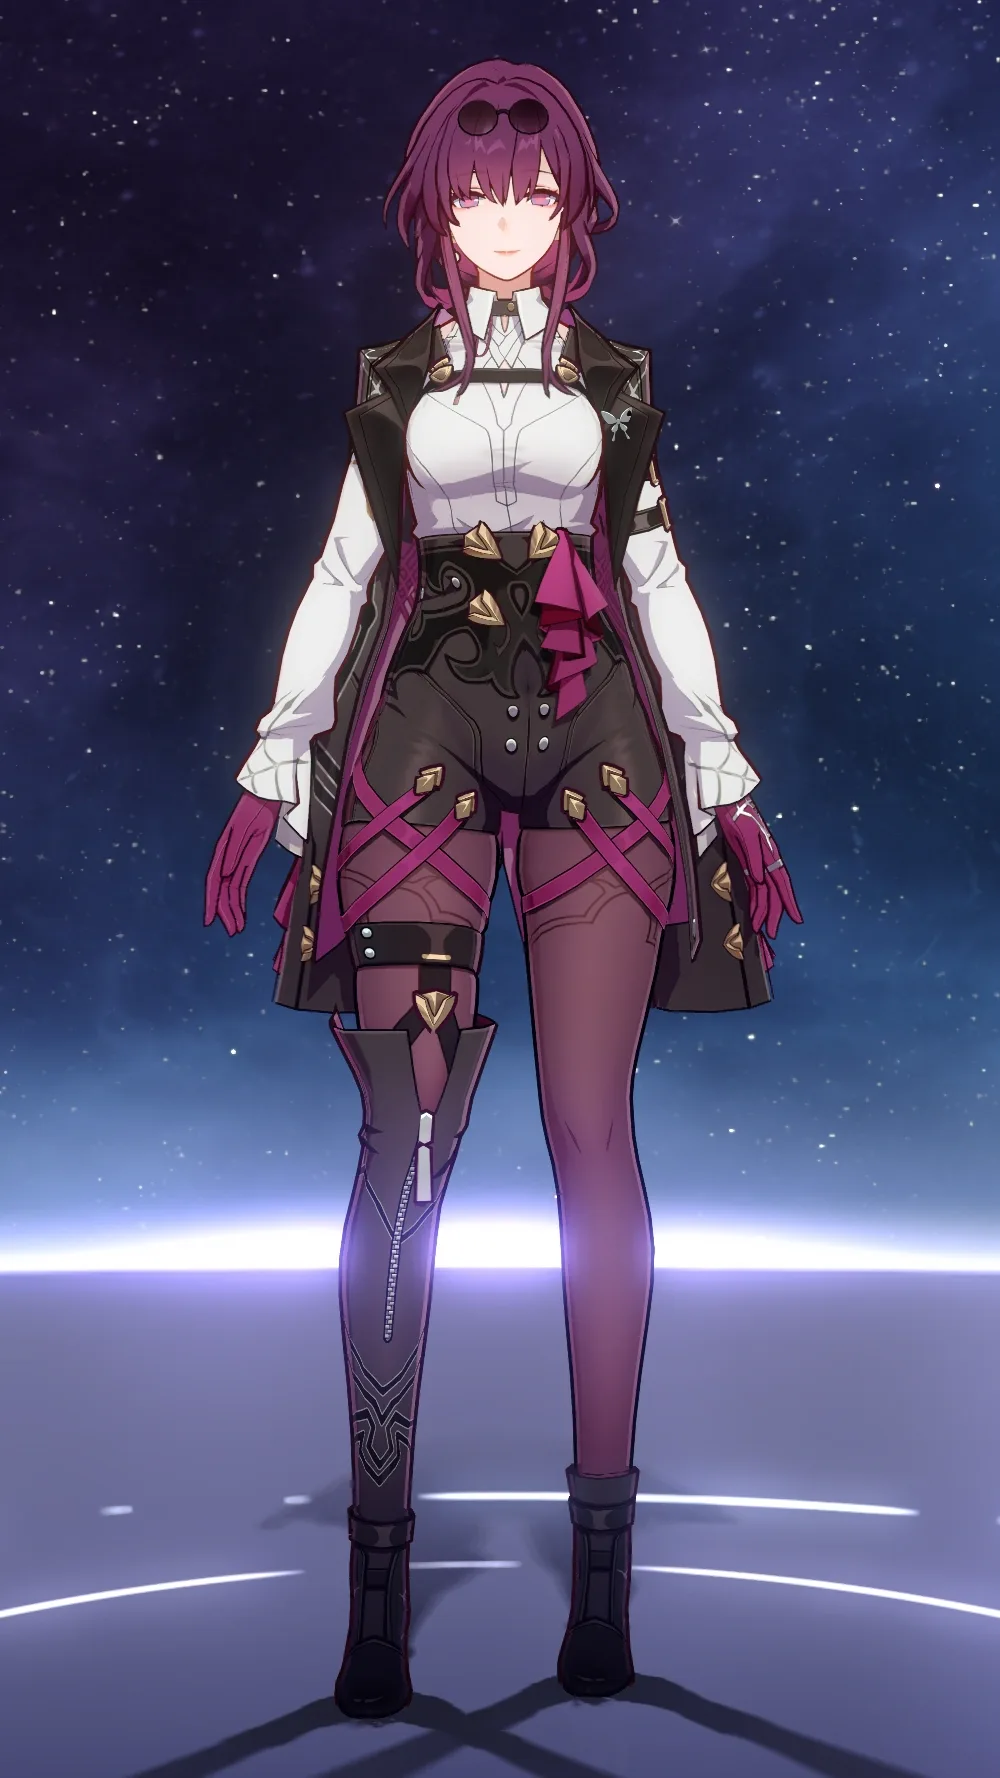
Kafka from Honkai: Star Rail built around a tailored wine-red blazer, fitted white shirt, shorts-skirt hybrid with decorative thigh straps, knee-high black boots, and 80cm wine-red wavy wig. The make-or-break detail is color consistency: the suit, wig, and trim all need to land in the same deep wine-red family, and they won't unless you buy the wig first and match everything to it. Includes 7 components, 14 materials, 12 milestones, 6 weeks, and a $130-310 realistic budget. Katana prop is optional but adds impact.
6 weeks
12
14
7
See the whole look before you start.
References, materials, budget, and build order for Kafka.
Timeline
6 weeks
Color refs




Materials
14 items
Budget
$130 - $310
save the visual refs
Full reference board
The preview above is curated for scanning. This is the working board you clone into your own build, with notes, colors, product images, and extra references intact.
Images are sourced from around the internet to help you get started. Use the web clipper to build your own reference library.
Reference images are gathered from around the web and belong to their original creators. We link back to where we found each one. If something here is yours and you want it taken down, email us and it is gone.
Build guide
The blazer is the whole build. Not the wig, not the katana. The blazer.
I say this because I've watched two different Kafka cosplayers at Fanime show up with beautiful wigs, perfect boots, fully assembled swords, and jackets that looked brown. Not wine-red. Brown. Under convention fluorescents, the wrong fabric shade turns what should be a rich cabernet into something that looks like a cheap suit from a Halloween pop-up. Both of them knew it by 10am. Both of them couldn't do anything about it.
Here's why this happens: the source art is lit warm. Golden light, HSR glow effects, promotional renders. That warms the red toward orange-brown. Buyers pick their fabric based on those screenshots, end up with something slightly muted, then stand under convention lights that shift everything further toward murky. The actual color you want lives in the hex range #6B1A2E to #7B2040, a deep wine-red with enough blue-purple to it that it stays vivid under bad lighting. When I did my build, I drove to the Joann in Burbank, pulled every bolt of matte crepe and ponte in the red-to-burgundy range, and held them against my wig under the store lighting until I found one that matched. That's the move. Not ordering fabric online.
Buy the wig first. Then buy the fabric. In that order, every time.
Uwowo's Kafka wig is what I used and the color is community-confirmed. If you have 6 extra weeks and a Taobao agent, Manmei saves about $10. For most people the Uwowo is worth the simplicity. Order it, let it arrive, then walk into the fabric store with it in a bag.
Once fabric is locked, the blazer construction is a lined princess-seam jacket with a few details. Interface the entire collar stand and the lapel facings. Not just the collar, the whole thing. Kafka's jacket has a very specific shape at the neckline with the gold trim sitting flat against a stiff backing, and if your interfacing is light or patchy the collar slumps by hour three. Princess seams front and back give you the waist suppression without a corset layer underneath. The gold soutache trim at collar and cuffs takes patience: tack it loosely first, check the spacing, then sew it down properly.
The shorts overlay panel is the second most-complained-about element. Don't attach it directly to the waistband seam. Clip it. A separate panel clipped to the waistband hangs correctly while you walk, repositions for photos, and can be replaced if it tears. The thigh straps: sew snap hardware at every attachment point before first wear. The decorative clips on budget costume sets hold for about four hours.
The katana is optional but it reads well in photos. An EVA foam build from an Etsy PDF template takes a weekend. Use an 8mm internal pipe in the handle and a 12mm through the blade spine. Skip the pipe and you'll have a 165cm wet noodle by noon. Build a fabric scabbard from black vinyl so you can sheathe it between photo ops. Your arms can't take that thing at full extension for a full con floor day.
Budget is $130-310. Give yourself 6 weeks. The blazer alone wants 2, between muslin mock-up and actual construction. Con crunch on a tailored jacket shows.
Components
Tailored wine-red blazer
Fitted white dress shirt
Shorts-skirt hybrid with overlay panel
Wine-red wavy wig
Thigh-high black boots
Decorative accessories (choker, earrings, rings, armbands)
Katana prop (optional)
Pattern Plan
Real sewing patterns for each piece of the Kafka costume: the commercial base to start from, a free alternative where one exists, and the exact modifications that turn the base into the character-accurate piece.
Tailored wine-red blazer
Modifications for tailored wine-red blazer: Use View A (hip-length). Replace the notched collar with a stand collar by omitting the lapel roll and extending the collar stand piece 1.5cm for Kafka's higher neckline. Add princess seams front and back per the pattern's armhole princess construction. Interface the full collar stand, lapels, and front facing pieces. Add a hook-and-eye closure at center front rather than buttons. Shorten sleeves 2cm and add cuff facings for the gold trim attachment.
Shorts-skirt hybrid with overlay panel
Modifications for shorts-skirt hybrid with overlay panel: Use the high-waisted base only. Omit patch pockets. Add 1cm ease at the front rise for a snug but comfortable fit. Cut the front overlay panel separately from remaining blazer fabric: a trapezoidal piece, 25-30cm wide at the bottom edge, tapering to 12cm at the waistband attachment. Clip the overlay to the waistband with a hidden bar tack rather than sewing it permanently. Attach thigh strap loops at side seams using grosgrain ribbon anchored with snap hardware.
Materials list
14 itemsEstimated total cost
$130 - $310
Milestone timeline
6 weeks- 1
Gather references: decide on default Kafka vs alternate outfits
Research
- 2
Buy and test the wig for color accuracy against fabric samples
Materials
- 3
Source wine-red suiting and match to wig under daylight
Materials
- 4
Draft or adapt a princess-seam blazer pattern
Patterning
- 5
Interface and construct blazer with waist suppression
Construction
- 6
Attach gold trim to collar and sleeve cuffs
Details
- 7
Source or sew the white fitted shirt
Construction
- 8
Construct fitted shorts base and attach wine-red overlay panel
Construction
- 9
Make and attach decorative thigh straps with snap backing
Details
- 10
Cut, core, assemble and paint the katana prop
Construction
- 11
Sew in wig combs and style waves with low heat
Finishing
- 12
Full suit-up and wear test with boots, wig, and accessories
Wear test
Frequently
asked questions.
Related tools and guides
Plan your build, estimate costs, and get ready.
Budget Calculator
Estimate your build cost before you start buying materials.
Convention Checklist
88-item packing checklist. Check off items as you pack.
Prop Scaling Calculator
Scale reference images to your body measurements.
How Much Does EVA Foam Armor Cost?
Real build budgets with specific products and dollar amounts.
Cosplay Commission Cost Breakdown
Real build budgets with specific products and dollar amounts.
Cosplay on Costumary
Templates, tools, and workspace built for cosplay makers.
Browse all templates
Explore build plans across 10 craft verticals.
Debut your cosplay build
Upcoming conventions where you could wear this. Dates, checklists, and budget tools included.
Start this build free
Clone this template into your workspace. Track materials, milestones, budget, and build progress in one place.
More from this series
Qifrey Cosplay
5 weeks · 12 milestones
Qifrey's elegant white-robed silhouette is built around three signature elements: the tall pointed hat with the bent tip and black ribbon, the flowing white cape with the brass brooch closure, and the asymmetrical pince-nez glasses with one dark lens hiding his scarred eye. This is an intermediate build that needs more structural crafting than sewing. The hat and glasses demand the most attention, while the cape is a manageable garment project. The glasses and the hat are the make-or-break details, and this template walks you through both. Includes 7 components, 15 materials with cost estimates, a 12-step build plan, and a realistic 5-week, $95 to $280 budget.
Coco Cosplay
6 weeks · 12 milestones
Witch Hat Atelier's apprentice witch in her full outfit: the tall pointed hat with ornamental band, a dark cloak with decorative hem trim, a layered tunic-dress, boots, and her drawing implements. The hat is the signature piece and the hardest to get right. 7 components, 13 materials, ~6 weeks at $120-280.
Sung Jinwoo Cosplay
7 weeks · 15 milestones
Solo Leveling's Shadow Monarch in his iconic default hunter outfit: a long black coat with purple inner lining, structured shoulder armor, fitted pants, and dual daggers. This is an intermediate hybrid build that combines garment sewing with foam armor crafting for the shoulder details, plus prop work for the daggers. The coat and its glowing purple lining are the make-or-break detail. Includes 7 components, 19 materials with cost estimates, a 15-step build plan, and a realistic 5-7 week, $120 to $320 budget.
Gojo Satoru Cosplay
5 weeks · 11 milestones
Jujutsu Kaisen's strongest sorcerer, built around three signature details: the black high-collar uniform jacket, the blindfold, and the white spiked hair. This is an intermediate build that leans on one well-made garment plus wig styling, so it reads instantly on the con floor without months of work. The collar and the wig are the make-or-break details, and this template walks you through both. Includes 6 components, 11 materials with cost estimates, an 11-step build plan, and a realistic 5-week, $90 to $240 budget.
Deadpool Suit Cosplay
5 weeks · 12 milestones
The Merc with a Mouth in full red and black: a head-to-toe spandex bodysuit with diamond-textured fabric, a face shell mask with white magnetic lenses, dual katanas on a concealed back harness, and a utility belt with pouches and holsters. An intermediate build that rewards patience with fit and details. Covers 7 components, 12 materials with cost estimates, a 12-step build plan across 5 phases, and a 5-week timeline at $120 to $350.
Arlecchino Cosplay
7 weeks · 17 milestones
Arlecchino (The Knave) is Genshin Impact's most cosplay-demanding Fatui Harbinger: a layered suit jacket, structured long coat with back chains, multi-color ombre wig, character-specific X-pupil contacts, and a full accessories set that runs 12+ pieces. This is an advanced build for cosplayers who can sew structured garments, handle prop accessories, and plan a full character makeup look. The make-or-break details are the coat's lapel structure and the wig's silver-black-red color work. Includes 8 components, 14 materials with cost estimates, a 12-step build plan, and a realistic 7-week, $180 to $420 budget.
Yuta Okkotsu Cosplay
6 weeks · 12 milestones
Jujutsu Kaisen 0's tragic sorcerer bound to Rika's curse: the black school uniform, textured black wig, cursed arm markings, and luminous katana. A balanced build across uniform tailoring, prop construction, and wig styling. 4 components, 11 materials, ~6 weeks, $120-280.
Doctor Doom Cosplay
7 weeks · 15 milestones
Marvel's greatest villain in his iconic green cloak and metal mask: a full armor build with a custom EVA foam mask, sculpted chest and shoulder plates, structured green hood, and gold gauntlets. This is an advanced project spanning foam shaping, armor attachment systems, and precision painting. 6 components, 14 materials, ~7 weeks, $180-420 budget.